KNOW’S NOTES – COMPETITIVE CYCLIST DISCOUNT, TUBELESS SEALANT, HELP ALEXIS
I held off last Friday’s Know’s Notes until this morning when I could announce an exclusive and unique deal of the week. You’ll also find an important tip on tubeless sealant, the most interesting comment I’ve seen in a long while, and a request for some feedback on a change I’m trying to how you see store links.
So lets’s get rolling…
DEAL OF THE WEEK
TARIFF-BUSTER! – Starting today, In The Know Cycling readers can get a one-time 10% Competitive Cyclist discount.
I have negotiated this tariff-busting discount with the good people at Competitive Cyclist who appreciate how well you, the great group of road cycling enthusiasts who read this site, line up against the first-rate selection of products and customer service they provide.
They don’t offer this or a better (or any) discount on any other site. It is exclusively available to you as an In The Know Cycling reader. Kind of what you’d expect one of my top-ranked online stores to do for you top-ranked roadies!
To get the discount, click this link to Competitive Cyclist or any link you see to the store on any In The Know Cycling page, put the items you want in the shopping cart, and enter the promo code ITKCC19 at the bottom of your cart page.
![]()
You won’t get the 10% Competitive Cyclist discount if you place an order through a Competitive Cyclist online or phone agent, through a link from Google or another site, or without going to the store and placing your order after clicking any red link like this one to Competitive Cyclist from In The Know Cycling. That’s just the way their systems are set up so they can track and reward the readers of this site exclusively.
The discount doesn’t apply to bikes or frames and there are brand and other exclusions because of agreements they have with suppliers. You can see an example of where to enter the promo code in your shopping cart and the list of exclusions here.
Bottom line, this Competitive Cyclist discount is an awesome offer from an awesome store. And they’ve agreed to do this for you through the holidays. It’s good one time so save it for a big purchase.
TIP OF THE WEEK
TOP OFF YOUR SEALANT – A friend dropped off a set of wheels he’s been riding tubeless for me to test recently. I took off his tires as I wanted to put my benchmark ones to evaluate the wheels without different tires complicating things.
Surprise, surprise, the only sealant left in those tires was some sticky stuff that helped keep the tire beads sealed to the rim hooks. Not a drop in the tires themselves, however.
If you’ve decided that tubeless is for you, congratulations. There are a lot of benefits that come with riding tubeless tires, puncture resilience being chief among them.
But if you are riding tubeless and still out on the roads this time of year as any good enthusiast should be, it’s probably time to check and top off your sealant.
There are all kinds of claims from sealant makers and experiences of sealant users about how long the stuff actually lasts. I don’t have that sorted out yet (topic for a future post!) but I know it doesn’t last forever.
My suggestion is that every 3 or 6 months or with the change of the seasons or when you recharge your Di2 or when whatever periodic milestone you can remember comes up, check your tires for sealant.
Here’s how:
1. Take your front wheel off the bike.
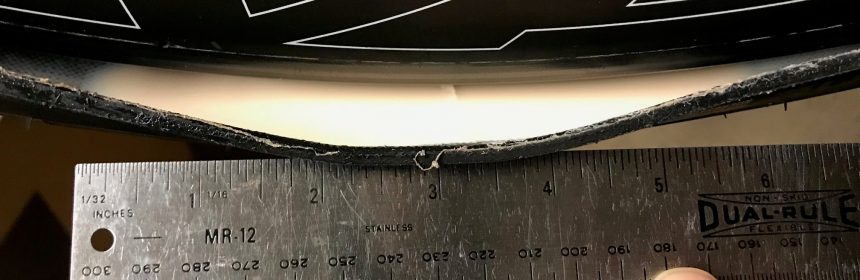
2. At the top of the rim and not near the valve, take off about 1/3 of one side of the tire away from the rim.
3. Carefully rotate the wheel a half turn so that the open tire is now at the bottom of the wheel.

4. If you see a pool of sealant about 6 inches (15cm) long, you are good. Less than that, you need to top it off.
5. You can add sealant with the tire open (which I recommend) or go to the next step without doing so.
6. Rotate the wheel another half turn so that the open part of the tire is back at the top of the wheel.
7. Put the open part of the tire back on the rim and reinflate it so the bead locks back into the rim hook.
8. If you didn’t add sealant when the tire was open (step 5), deflate the tire, remove the valve core, put the needed sealant in, replace the valve core, and reinflate the tire.
If you last filled your front and rear tires with sealant at the same time and didn’t have a puncture that might have used some up, you can top off your rear tire through the valve with the same amount your front one needed. If you want to be sure to put the right amount in, take your rear wheel off and go through the same steps you took with your front tire.
You want about 1 ounce/30 ml in total or 6 inches/15cm long of sealant for 23C, 25C or 28C road bike tires. If, for example, you only saw a 3 inch or 7.5 cm length of sealant in your tire, then you need to put half an ounce or 15 ml of sealant.
COMMENT OF THE WEEK
HELP ALEXIS WITH HIS THESIS – As cycling enthusiasts, we endure a lot. You might even say we are into endurance.
Reader and commenter Alexis looks like he’s trying to establish the value of our masochistic endurance tendencies to nearly every aspect of life.

If you want to help him more than I was able to, feel free to add your comments at the bottom of this post or the page here where he posted his initial comment.
Can’t wait to see what you come up with!
ON THE SITE
DO YOU HAVE A PREFERENCE? DO YOU CARE? – I’m testing out a new way to give you the store links I put in each post to get you to the gear I’ve reviewed at the best prices from the best stores.
Currently, I use red store name links that follow in the text of reviews and look like this…

I’ve been trying out more graphic store links that look like this…
 I’m considering going to the graphic links to cut down on the time it takes to update the links and give me more time to do other stuff on the site. The more graphic links automatically update daily once I set them up but are not as exact or comprehensive as the red text ones. The red text ones are manually updated every week or so but can take you to a more accurate set of product listings and across a few more stores that don’t provide automated links.
Please let me know what you think of this by answering this one question below.
[polldaddy poll=”10123156″]
That’s it for now. Thanks for reading and supporting the site.
Be sure to follow, like, share, etc. using the buttons to the right to keep up with things going on during the week and get the word out with your cycling friends about what we’re up to.
In The Know Cycling supports you and your fellow enthusiasts by doing hours of independent and comparative analysis to find the best road cycling gear and kit to improve your riding experience.
You support us and save yourself money and time by buying anything at all through the links to stores we’ve picked for their low prices and high customer satisfaction. These stores pay us a small commission when you buy there after clicking on these links. Thank you.
There’s a product, MilkIt, which makes checking sealant levels (and topping up) a non-messy affair and doesn’t require removing the tyre in any way. It requires their special valve (for each wheel) and a single special syringe kit. It takes only a few minutes to do a check so it’s easy to set a reminder to check every 3 months or so.
For puncture issues on the road, do you recommend carrying plugs? If so, what brands do you like and are they easy to use?
Steve, I have never used plugs. If I have an issue on the road that doesn’t seal on its own, I’ll throw in a tube. Steve