THE BEST POWER METER PEDALS
Power meter pedals like my recommended Favero Assioma joined with dedicated training can give cycling enthusiasts one of the easiest and most cost-effective ways to get faster. Or, they can help you choose and enjoy your Zwift group and individual rides better no matter how fast you are. If you simply want more useful data about your riding performance, power meter pedals will also do that very effectively.
With most models now at least two generations old, the price, set-up requirements, and reliability of the best power meter pedals have significantly improved. There don’t appear to be any game-changing technologies or approaches on the way that would greatly diminish or obsolete their functionality or benefits compared to other ways of measuring your power.
If you’ve been thinking about how to raise your performance level or become more attuned to how well you are doing on your bike, this post reviews and compares the best power meter pedals to help do it.
WHAT YOU NEED TO KNOW
Click on any red statement below to go directly to that part of the post. Click the back arrow to return to this list.
BEST POWER METER PEDAL RECOMMENDATIONS
If you want a full-function power meter that’s the easiest to install on any road bike or move between them, is reasonably priced, and you don’t have preference concerns, pedals with built-in power meters are your best option.
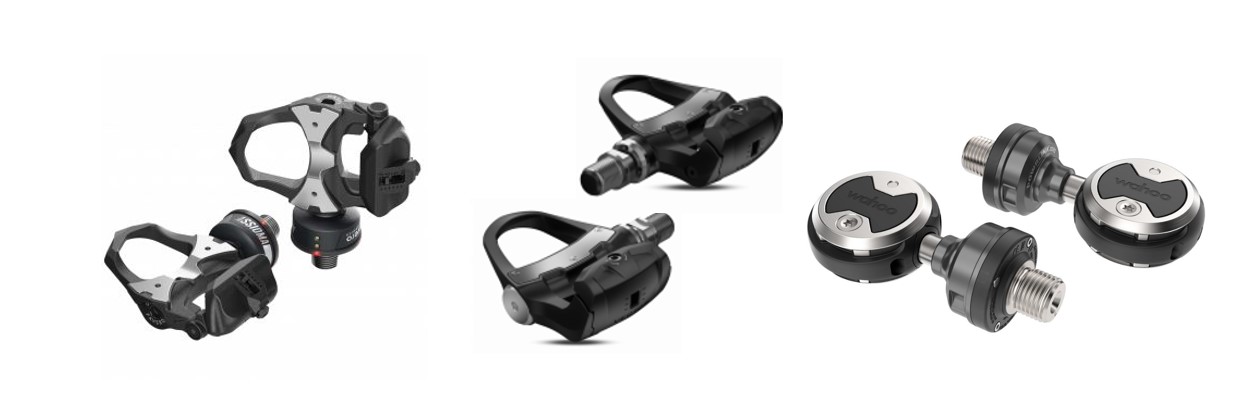
Among the proven power meter pedals, I recommend the Favero Assioma because of its lower price, long-term reliability, and proven accuracy and consistency compared to the models from Garmin, Wahoo, and SRM. You can get the Favero Assioma Duo with independent left and right leg measurement for Shimano or Look-style pedals or the Favero Assioma Uno that measures and doubles your left-leg power for Look-style pedals using these links to Competitive Cyclist, Power Meter City, Amazon, and others in Know’s Shop, all stores I rate highly for their competitive pricing and customer satisfaction.
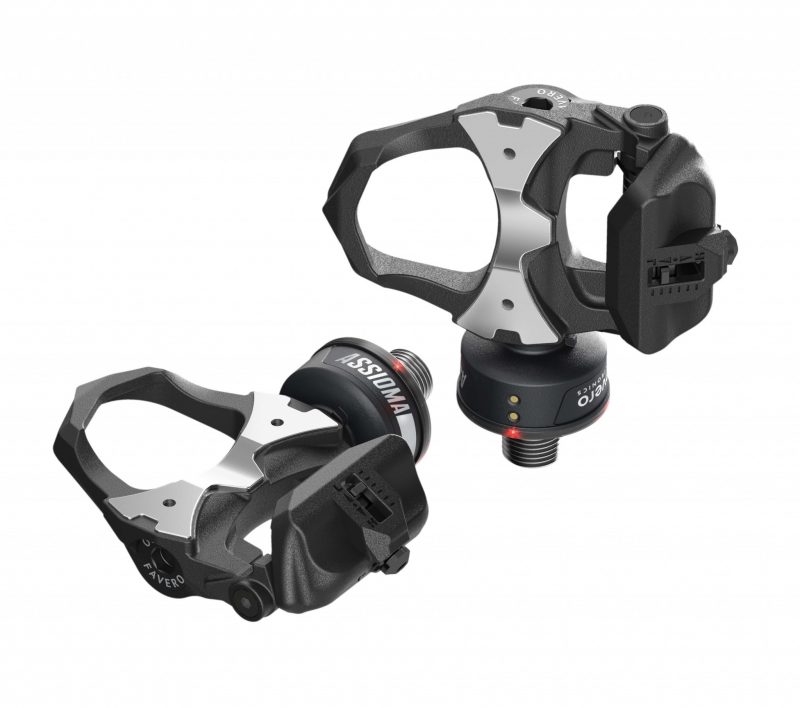
Most enthusiasts only need the Favero Assioma UNO, the US$450/£450/€546 Look-style pedal set with a power sensor in the left pedal. If you know or believe there is a significant difference in the power you put out between your left and right legs or you want to measure and analyze all the data you can from a power meter, the US$600/£555/€600 Favero Assioma DUO-SHI (Shimano pedal spindles) or US$720/£595/€710 Favero Assioma DUO (Look-style pedals) has sensors for both pedals and is the best choice among dual-sided power meter pedals.
As you can read in my power meter pedal comparisons below, you don’t get meaningfully better accuracy, consistency, or metrics from the other power meter pedal options – the Garmin Rally, Wahoo POWRLINK, or SRM EXAKT – than you do from the Favero Assioma. Depending on the model, they will also cost you at least $200 more than the Favero Assioma and have a shorter reliability track record (Garmin, Wahoo, SRM), use disposable batteries (Garmin), or require a complicated set-up (SRM).
You may have heard of and still see the Powertap P2 pedals for sale at some stores. These are no longer being made. The Garmin Vector 3 has also been replaced by their Rally pedal power meter.
You can buy the new Garmin Rally pedals with either Shimano SPD-SL (road), SPD (off-road), or LOOK Keo-style pedal bodies. They were just introduced in March 2021 and are just now coming up on one year of use in the field. While they are essentially the established Vector 3 spindles and electronics with Shimano or KEO pedal bodies, the battery doors that caused reliability problems with the Vector 1, 2, and initial Vector 3 were changed on the Vector 3 just 6-months before the Vectors became the Rally and use different batteries. I’ve not heard of any battery door, battery, or other reliability issues with the new Rally but with the Vector history, I feel it’s prudent to keep a careful watch on this and I will do so.
In February 2022, Wahoo introduced the Speedplay POWRLINK power meter. While a couple of trusted independent testers had access to it for 6-12 months before launch, most of us are just getting our initial season of experience with it. The POWRLINK performed well – accurate and consistent – on my test rides and those of the longer-term testers.
Wahoo has proven its power measurement experience from its smart trainers and has significantly retooled the Speedplay line and manufacturing facilities since acquiring the business. This makes me hopeful but still waiting to verify its long-term reliability over the course of several seasons.
While it can happen, the Favero BePro predecessor and Assioma being a shining example, it’s not often that first-generation power meters hit the reliability levels I’d be willing to buy into myself or recommend that you do.
TIME pedals were recently purchased by SRAM and are now essentially off the market. While I expect it has some, SRAM hasn’t announced plans for the pedals let alone for any TIME power meter pedals. As I mentioned earlier, SRAM also discontinued the Powertap line it bought previously including the P2 power meter pedals.
I’ll update this post as we learn more about the Garmin Rally and Wahoo Speedplay POWRLINK reliability or anything relevant about SRAM TIME pedals come to light.
PURPOSE IS KEY TO GETTING VALUE FROM A POWER METER
In the mid-2000s when power meters were first sold to road cyclists, they were the expensive tools of elite racers and personal coaches. These power meter suppliers, racers, and coaches were true innovators, working to better understand the relationships between power and performance. In the process, they developed power meter gear, measurements, and training techniques to make riders faster.
That innovation continued in multiple directions for a decade. By my count, the number of companies selling proven power meters increased from 3 in 2006 to 14 by 2016. The range of locations where power meters could take measurements expanded from either the hub or crankset spider in 2006 to include the crank arm, pedal, bottom bracket spindle, or handlebars ten years later.
By the end of that period, a great many new or existing companies had entered the power meter business. Some were acquired by established cycling industry or power meter companies, and a few newer players were beginning to drive everyone’s prices down.
Simpler, less costly products based on the same application of power meter strain gauge technology were commercialized into newer products. At the same time, a wider range of metrics was created and ANT+ and evolving Bluetooth communication protocols became dominant. To display and analyze your power, Garmin head units and the TrainingPeaks software platform became the most widely used tools.
The number of coaches and range of training approaches expanded to advise a larger group of professional and amateur racers. They were also there to help regular cycling enthusiasts (like me) who enjoyed trying out new technology.
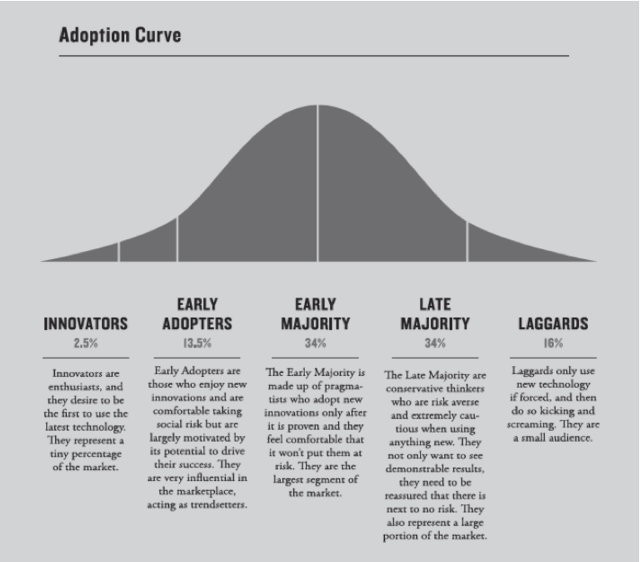
In the terminology of the Rogers Adoption Curve, the early to mid-2010s was the period when Early Adopters got into power meters. Between a power meter, head unit, subscription analysis service, training plan or a coach, Early Adopters invested serious money and time to determine how to improve our speed.
The primary purpose of buying a power meter was to improve fitness, speed, and performance in different riding situations (hills, sprints, races, endurance rides, etc.). I went through that process and wrote up this section on how I train with a power meter back in 2016. My training program and results are a lot better now and I’ve changed out my head unit and tested a ton of power meters since then but the approach to training with power is more or less the same.
In the second half of the 2010s, we’ve seen the equivalent of a “selection” in the power meter marketplace.
A group of power meter suppliers and products converged and moved away while others fell off the back. The cost of most power meters dropped considerably from the $1000-$2500 power meter purchase price. Power meter metrics and training approaches converged around ones that more cyclists could easily interpret and do something with to achieve our goals.
We now have lower-priced power meters that are easier to simpler installation and set up. There’s better information to help choose proven ones and a better understanding of how enthusiasts can use them to our benefit. The result is that more cyclists are buying them.
We are now in the Early Majority stage when risk-averse users are adopting power meters. And in this stage, according to discussions with fellow enthusiasts using power meters and those selling them, improving speed and performance is no longer the only or even the primary reason we cyclists use power meters.
Zwift has the individual and group ride of choice for many mid-week, weather-bound, and Covid restricted enthusiasts. Knowing your functional threshold power or FTP and your power-to-weight ratio has become the best way to pick the right group to ride with to both enjoy and challenge yourself.
Some are buying smart trainers with built-in power measurements for this purpose. But, power meters attached to your bike allow you to measure and compare yourself both on Zwift and out on the road with your riding buddies in group rides, races, and distance events or when you ride individually. Along with that comes the measurement consistency and confidence you get from using the same power measuring tool regardless of whether you are riding indoors or on the road.
Cycling enthusiasts are also being drawn to power meters to more effectively measure and manage how much energy we use at different points of a ride, far better than we would by looking merely at our speed, heart rate, or considering our RPE or rate of perceived exertion.
For example, we can pace to a power level we know we can maintain during a ride or for specific sections of it, like going up a big climb or for long rolling terrain to “save enough matches” for all the hard efforts we’ll need over the course of the entire ride.
So now, along with or instead of using a power meter principally for the purpose of improving your speed or performance as part of a training block or plan, many of us will use one to ride with the right Zwift group and better manage our efforts, performance or endurance and enjoyment for specific events or long road rides.
Regardless of your purpose, it’s important that you have one or several of these in mind to get the most benefit from using a power meter.
WHEN A POWER METER IN YOUR PEDALS IS THE RIGHT CHOICE
When I evaluate power meters, I look at four sets of criteria.
Performance – Accuracy, consistency, torque zeroing, temperature compensation/calibration, and battery life.
Design – Measurement location(s), compatibility, ease of installation and transferability, battery type, interface with cycling computers and measurement software/application, ease of use, start-up, unit weight, firmware update-ability, and communication protocol (ANT+ or Bluetooth or both).
Quality – Product maturity, durability/maintenance/build quality, reliability, dealer/parts/service infrastructure and support, repair service, warranty, service life, and company long-term viability.
Cost – Unit purchase cost net of any new or removed computer, cranks, crankset spider, wheels, or sensors to make the PM functional in your existing or planned bike/wheels/chainset set-up(s), and any installation, maintenance, or service costs as measured in your currency, amount of hassle or lost time using your power meter.
Comparing Types of Power Meters
When comparing the best power meter pedals against the types of power meters that go on your cranks or in your chainset or at other places on your bike, I start by looking to see if there are any significant performance differences of the kind I’ve described above.
For the most part, and certainly, for the purposes that most road cycling enthusiasts use power meters, you won’t get better or worse performance from one type of direct force power meter vs. another.
I wouldn’t include power meters that you put on your handlebars that use air resistance to compute power in that comparison. I also acknowledge there are a few stinkers sold that don’t perform as well as most of the others but not because of the type of power meter they are.
People also focus on accuracy (usually quoted between 1% and 2%) more so than is meaningful. They also argue that some locations give you a more accurate reading of your power because it is closer to where the power is being produced (e.g. pedal vs. hub), how well it captures the true output of your power throughout your pedaling stroke (cranks and chainsets vs others), how many strain gauges can be placed in a given type of power meter (more in cranks and chainsets), and other reasons.
For me, these are engineering and marketing debates rather than ones that affect the performance and measures most road cycling enthusiasts need from a power meter.
Accuracy within 2% is good enough for most enthusiasts. Consistency from ride to ride is far more important and built in temperature compensation/calibration is essential and commonplace among most of the better power meters. The ability to easily do a zero-offset before each ride is also key. Getting at least a month or about 1000 miles of battery life is also important.
The Favero, Garmin, and Wahoo power meter pedals, as do most of the established power meters that go on your cranks, chainset and rear hub, meet those performance marks.
However, if you want a full-function power meter that’s the easiest to install on any road bike or move between them and is reasonably priced, pedals with a built-in power meter are your best option.
With the performance bar cleared, net cost (which is more than just price – see above), ease of installation, and transfer between bikes are the next important selection criteria to consider. Reliability is critically important. Finally, your preference is always important.
Preference
While I’ll get into other reasons for and against power meter pedals below, the biggest reason for not using them – at least until newly introduced or announced pedals are vetted by independent testers and cycling enthusiasts – would be if you have a strong preference for a pedal other than the LOOK KEO style, Shimano Ultegra or lower tier, or Speedplay Zero models used in power meter pedals.
There isn’t currently a power meter solution that uses Shimano’s Dura-Ace pedals, a popular one amongst the most demanding enthusiasts and racers. If you prefer other LOOK or Speedplay pedals or any from TIME or other road pedal brands, you’ll have to get your power measurements from the crank arm or crankset spiders.
The good news is that most road cycling enthusiasts already use LOOK KEO style, Shimano Ultegra or 105, or Speedplay Zero pedals or ones close enough to them in design that adopting power meter pedals based on them would not require a major transition.
The other preference worth considering is left or single-sided vs. dual-sided power measurement. As I’ve written above, unless there is a significant difference in the power you put out between your left and right legs or you want to analyze all the data you can from a power meter, you don’t need to use a dual-side power meter on your bike.
I’d always used a single-sided power meter. Then I broke my left femur in a few places and created a lot of muscle trauma for my IT band. After recovering and doing my PT, I got the right side power meter that went with my left because I was convinced the left leg was going to be weaker and my vanity told me I wanted the highest total power reading I could get.
Turns out, my “imbalance” was typically 48%-52% or 49%-51%. 1 to 2% difference. Insignificant and more typical than not.
To add insult to the injury of my budget for the right side power meter, the left leg that I broke wasn’t always the weaker one. Sometimes the 48% or 49% was the right leg power. Perhaps my rehab had strengthened the left leg in a way that caused it to perform differently on some types of terrain or at different places on a course than others. Or maybe my fitter adjusted things to minimize the difference. Or maybe there was essentially no difference and 1% or 2% was within the power meter’s left-right balance accuracy range.
Who knows. After thinking about it way too much for way too long, I seldom look at that left-right balance anymore. It just doesn’t matter. Instead, when my testing or riding causes me to go back and forth between a couple of bikes often during a stretch of time, I’ll put the left power meter on one bike and leave the right one on the other.
The Favero Assioma with LOOK-style pedals, all the Garmin Rally models, Wahoo POWRLINK ZERO, and SRM EXAKT give you the option of buying a single or dual-sided power measurement. You can also buy the single-sided unit and then add the other side later as I did with most of these.
Note that if you are big into Zwift, the app gives you overall power but does not give you left-right power or balance information. You need to rely on your Wahoo or Garmin head unit for those metrics and you can’t use those at the same time you use Zwift.
Installation and Transfer
Power meter pedals are the easiest of all power meter types to install. With the exception of the SRM (which I’ll get to in my reliability comparison discussion below), you merely hand screw them into your cranks as you would any set of pedals, tighten with an 8mm hex wrench (or a pedal wrench for the Garmin Rally), and you’re done. With the exception of the Wahoo POWRLINK, there’s no torque spec you need to hit for proper accuracy and it’s really not critical with the POWRLINK as long as you put a good deal of your weight into tightening them down. Except for the SRM, you don’t need to calibrate the power meter for the torque level.
Here’s an installation demonstration using a retired power meter pedal model.
As with any other power meter, you then pair it to your head unit if it’s your first time using the power meter, set your pedal lengths, and either manually or automatically calibrate it for starting temperature. If it’s the first time you’ve ridden it since installing it or transferring it from one bike to another, it’s a good idea to ride it for a few hundred yards/meters and include a couple of sprint efforts to make sure the pedals are tight, stop and calibrate it again, and then get back on and go.
If you have more than one bike, power meter pedals are also the easiest to transfer. Loosen them with the wrench, unscrew them, and put them on your other bike.
Unlike seemingly every other bike component, any set of pedals can screw into any crankset regardless of brand or model. It takes two minutes tops and most of that time is usually taken finding and putting away your wrench and then cleaning any grease off your hands.
For some, the ease of installation and transfer is one of the top two or three reasons for picking one type of power meter over another.
Cost
When considering what a power meter costs, you should look at both its purchase price and any costs associated with adding it to your bike and riding plans.
A purchase price comparison is pretty straightforward.
Here’s the comparison of list prices for the dual-sided models
- US$1000/£850/€1000 for Speedplay POWRLINK
- US$1100/£970/€1100 for the Garmin Rally Shimano or Look pedals
- US$720/£595/€710 for the Favero Assioma Look model
- US$600/£555/€600 for the Favero Assioma Shimano version (spindle only; attach your own Shimano pedals)
And for the single-sided ones
- US$650/£550/€650 for Speedplay POWRLINK
- US$650/£580/€650 for the Garmin Rally Shimano or Look pedals
- US$450/£450/€546 for the Favero Look model
- Favero doesn’t sell a single-sided Shimano version
Note that Favero doesn’t seem to restrict its retailers from setting their own, often lower prices for their power meters while Garmin and Wahoo appear to keep their retailers’ prices in line with the “recommended” retail prices you see above.
By comparison, single or left-side crankarm power meters price out between $350 and $450 for the current generation of Ultegra R8000 and Dura Ace R9100 Shimano models from the likes of 4iiii and Stages. This range is similar to the purchase price of the left-side Favero Assioma Uno power meter pedals. Power meter cranks for SRAM, Cannondale, and Campagnolo cranks are more.
Dual-side crankarm aka crankset power meters run about $725 for the Ultegra and $950-$1000 for the Dura Ace. Again that’s in the range of the power meter pedals with the Favero Assioma Duo besting them all by a little or a lot. Of course, you get the crankset with the power meter so save on that expense if you were due for a new one or wanted an upgrade. Again the dual-side crankset power meters for SRAM, Cannondale, and Campy are more expensive.
You can have Stages power meter sensors added to your existing crank arms for many common models. This will cost $300 for Shimano’s left crankarms and $500 for their crankset. Stages can also add a sensor to your SRAM, Cannondale, and Campy left crank arms for about $400. They don’t install power sensors on entire cranksets from those three brands.
If you already have a crankset that you weren’t planning to change out anytime soon, buying a power meter that forces you to replace it gives you a sunk cost to add to the overall tally. Of course, you could sell it to help defray the cost of your power meter.
Bikes don’t come with pedals and Look Keo pedals cost around $125, Shimano Ultegra level SPDs go for $200 and similar level Speedplay will run about $225. That’s the least sunk cost of any power meter option.
When you net it all out and depending on the specific models you chose, power meter pedals along with crankarms are generally two of the lowest cost types of power meters you can buy.
Spider power meters sit between your chainrings and offer another option. They calculate your total power and use different algorithms to assign the power to your left and right leg. Depending on what brand and model of crankset they are designed for, you’ll generally pay from $500 to $1000.
Spindle power meters that go in the bottom bracket and hubs power meters that go on your rear wheel aren’t being made anymore. The relative ease of installation and transfer of the pedal, crankarm or crankset, and spider power meters without any cost or performance disadvantages (and often advantages) made the others obsolete.
Reliability
There is nothing I’m aware of that makes a power meter more or less reliable or durable than another based on where it is on your bike. Some brands and models are more or less reliable or, due to how long they’ve been made have more or less of a reliability track record but that has more to do with the design and manufacturing of the power meter rather than what component the power meter is built into or attached to on your bike.
In The Know Cycling is ad-free, subscription-free, and reader-supported. If you want to help keep it rolling without any added cost to you, buy your gear and kit after clicking the store links on the site. When you do, we may earn an affiliate commission that will help me cover the expenses to create and publish our independent, comprehensive, and comparative reviews. Thank you, Steve. Learn more.
COMPARE PRICES, PERFORMANCE, AND FEATURES
As I wrote in my recommendations at the top of this review, the price and reliability of the Favero Assioma make it the clear winner among power meter pedals. It is available using these links to Competitive Cyclist, Power Meter City, Amazon, and others in Know’s Shop, all stores I rate highly for their competitive pricing and customer satisfaction.
It’s certainly worth knowing how each of the power meter pedals do on the other performance, design, and quality criteria I use to evaluate and choose which to recommend. I’ll go through those in the discussion below.
Safe to say, they perform similarly enough on most of the other measures. On those where there are some differences, there isn’t enough of a practical effect to make the case that you should buy something other than the Favero Assioma.
Below I go through the differences that matter, the ones that don’t, and the criteria where there is no difference between these power meter pedals.
Differences That Lead to My Recommendation
PRICE – There are significant price differences for products that for all practical purposes perform equivalently. Below you can see the brands in order of increasing price. The dual-sided model is listed first for each brand.
Favero
Assioma DUO (LOOK) – US$720/£595/€710
Assioma UNO (LOOK) – US$450/£450/€546
Assioma DUO-SHI (Shimano) – US$600/£555/€600
Favero doesn’t sell a single-sided Shimano version
Available through these links to Competitive Cyclist, Power Meter City, Amazon, and others in Know’s Shop, all stores I rate highly for their competitive pricing and customer satisfaction.
Garmin
Rally RS200 or RK200 – US$1100/£970/€1100
Rally RS100 or RK100 – US$650/£580/€650
Available through these links to Competitive Cyclist, Planet Cyclery, Power Meter City, Tredz, and Know’s Shop.
Wahoo
POWRLINK ZERO Dual Side – US$1000/£850/€1000
POWRLINK ZERO Single Side – US$650/£550/€650
Available through these links to Competitive Cyclist, Power Meter City (10% off with exclusive code ITKPMC10), and Tredz 10% off w/code ITKTDZ10
SRM
EXAKT Dual – US$1300/£1040/€1260
EXAKT Single – US$750/£690/€790
Available through these links to Competitive Cyclist, Power Meter City (10% off with exclusive code ITKPMC10), .
RELIABILITY – As best as I can tell from all the user forums and reviews I’ve read and from the retailers I’ve spoken with, there are absolutely no reliability issues with the Favero Assioma power meter pedals.
That’s not always been the case with Garmin. The Vector 3 and earlier models had issues with water ingress and battery contacts. Garmin is using the same battery doors that were last updated about 6 months before the Rally was introduced and is using a new battery for Rally models. It will take some time to see how well these changes affect reliability when up against independent testers and users riding the Garmin Rally in the real world. A year on since the Garmin Rally was introduced, I’ve not seen reports of similar or new problems of the scale Garmin had with the Vectors.
The Wahoo POWRLINK ZERO was introduced in February 2022. While a couple of long-term testers reported no issues, it’s too early to judge the unit’s reliability.
The SRM EXAKT has a different type of reliability issue. Because its installation requires such a level of a) effort and b) precision, it’s not likely you’ll always get it right. And if you can’t get it right, the data is not going to be reliably consistent, no matter how high a level of accuracy they claim.
If you plan to move your EXAKT pedals between bikes, you may get better at the whole process. But, since installation still requires the same level of a) effort and b) precision, I don’t think the data will become any more reliable and may actually become less consistent.
Little effort and no precision are required in the setup of the Favero and Garmin. You screw in the pedals and tighten slightly. No torque measurement is needed.
Wahoo gives you a torque specification that equates to tightening it down pretty hard. But if you do the latter rather than pull out a torque wrench, your results won’t be affected. Hand tightening as you do with the Favero and Garmin won’t be enough with the Wahoo.
In all cases, make sure you put a washer on the spindle between the crank arm and pods on the Favero and Wahoo. This will protect the pod from tightening directly against the crank arm and potentially cracking.
BATTERIES – When it comes to powering your power meter pedals, I take both battery life and battery type into consideration.
By the numbers, it looks like the Garmin Rally’s claimed 120-150 hours of battery life and SRM EXACT’s 100 hours outlast the manufacturer claims for the Wahoo POWRLINK (75 hours) Favero Assioma (50 hours).
But, for my riding and I think for most road cycling enthusiasts, even the Favero with its 50 hours of battery life is more than enough between charges. I don’t see a lot of benefit from having 2 or 3 times that battery life.
I ride 10-12 hours a week. When I tested the Favero Assioma, I got a little over a month between power meter charges. While I know my electronic shifting Di2 battery lasts longer, I recharge it at the beginning of every month just so I don’t have to ever wonder or worry about when I last charged it.
My GPS head unit and front and rear lights don’t last nearly as long. They get plugged in every Sunday after a week of riding or on Friday if I’ve got a century ride or longer event planned for that weekend.
I consider battery type more important than battery life. For me, plugging a USB-A connected clip onto your power meter to recharge it, as you do with the Favero, Wahoo, and SRM is easy and hassle-free.
Buying and keeping batteries around and replacing them, as you need to do with the Garmin Rally is more of a hassle. And given Garmin’s history of reliability issues caused by the battery doors, why tempt fate? The Garmin Rally also uses the less common CR1/3N button cell batteries.
While not as important as price or reliability, the simplicity of merely plugging in the pedals nudges the Favero Assioma further ahead of the Garmin Rally power meter pedals.
Differences That Don’t Matter in Practical Use or My Recommendation
ACCURACY – Garmin, Wahoo, and Favero quote +/- 1% whereas SRM claim +/-1.5%. That’s a difference of +/- 2 watts if you are putting out 200 watts, or +/-4 watts at 400 watts. I’m not going to notice that, certainly not relative to all the other ways I can save a lot more watts in a dozen different ways.
Yes, you can get super geeky on me and refer me to reviews that compare these power meters and others and in different situations to show some measurable differences. Some of these pedals report power readings a little higher or lower overall or smooth differently or react faster or slower under acceleration.
I’ve looked at this kind of data and I admire and appreciate the heck out of Ray at DC Rainmaker and some of the others that create it. It’s interesting data but in the end, the differences are not ones that will matter to most enthusiast-level riders or will affect your training and riding and Zwifting.
CONSISTENCY – While it is important that your power meter provides accurate readings, it is far more important that those readings be consistent from ride to ride for the same level of effort. In other words, I care less that my power meter may read slightly high or low or the same compared to others than I do that it is consistently high or low or the same.
If your power meter is consistent, you can compare your performance and improvement over time. If it’s not, then you really don’t know how you are doing relative to your training plan or goals or where you best slot in with your fellow Zwift riders or whether you are getting any faster on a given course you may regularly ride to test yourself.
Independent testing done by Ray and others show that the Favero Assioma, Wahoo POWRLINK, and Garmin Rally are consistent from ride to ride.
If you haven’t already eliminated the SRM EXAKT for their price and reliability, you can now do so for their lack of consistency. Ray’s tests show that their readings compared against other power meters tested alongside them are inconsistent over multiple tests.
This is probably as good a time as any to remind you that you want to zero-offset (or “calibrate”) your power meter at the beginning of each ride, regardless of the type of you are using. If you don’t, there’s no guarantee that it will read consistently with the last time you used it.
Zero-offset is an easy process for most power meters. Put your bike outside for a few minutes for it to come to ambient temperature while you put on your shoes, helmet, etc. Turn on your head unit, wake up the power meter by moving whatever it’s attached to, move it into position if one is prescribed, and push the zero-offset button on your head unit. Within a few seconds the zero-offset is done and off you go on your ride. With the POWRLINK, the zero-offset is done automatically once you set up the bike as I’ve described
If it is the first ride since you transferred your power meter from another bike or you didn’t have a chance to put it outside for a few minutes before you jumped on, ride it for a few hundred yards/meters to make sure everything is on tight and at temperature and then do your zero-offset.
BLUETOOTH APP PAIRING – Because of the number of available channels, Zwift and other live app platforms using Bluetooth only pair with your power meter across one channel. Since the independent left and right leg power meters use two channels, Favero, Garmin, and SRM have each come up with a way to combine the power from each pedal’s sensor and send it over one channel rather than doubling the power of one of your channels.
The Wahoo uses 3 independent Bluetooth channels.
While you don’t left-right balance info on Zwift, you will get total power based on the sum of the independent left and right sensors.
WEIGHT – We have all had it drilled into our heads that weight matters when choosing between cycling components. Weight does matter to your speed and performance when you are talking about hundreds of grams of difference and after you consider other factors like your own weight, your bike weight, getting proper rest and nutrition, your position on the bike, and a half dozen other things. (See my list and explanation of the top 10 ways to ride faster on your road bike for more.)
There are small weight differences between these power meter pedals that don’t matter so I won’t even quote them.
Don’t believe me? Watch this TrainerRoad video that analyzed the insiginficant effect of 80 grams of difference in shoe weight.
PEDAL BODIES AND CLEATS – With the exception of the SRM EXAKT which is actually a partnership between SRM and LOOK, none use pedal bodies or cleats made by LOOK in their power meters. Garmin uses LOOK KEO-style cleats and pedals they’ve designed and made (or contracted) and Favero uses ones made by Xpedo. Actual LOOK pedals and cleats don’t wear as well as those Shimano or Wahoo/Speedplay ones and I had a quieter and longer-lasting experience using Favero’s Xpedo pedals and cleats than using those made by LOOK.
Garmin has produced the Shimano-style Rally RS200 or 100 pedal bodies. You can use either the cleats they supply or Shimano-made SPD-SL cleats. Favero supplies only spindles equipped with power meter pods for their DUO-SHI Shimano model. You remove the spindles from your Shimano Ultegra or 105 bodies and put them on the Favero ones and use the cleats that came with your pedals.
The Wahoo POWRLINK ZERO uses the same Speedplay pedal bodies and cleats as those used for the unpowered Speedplay pedals. While the POWRLINK comes with a complete set of cleats, you can keep using the ones you had previously installed on your shoes.
Q-FACTOR – The Q-Factor is the distance between the crank arm and the center of the pedal body. A wider Q-factor can allow more room for riders typically taller than 178cm/5′ 10”, those with wide feet or shoes larger than EU46, and those with stiff or tight hip flexors or bad knees the added space needed to reduce the bow-legging and knee strain that comes from clipping into shorter or narrower than comfortable pedal spindles.
All but the Favero DUO-SHI have a Q factor between 53mm to 55mm. The DUO-SHI has a 65mm Q-factor. Placing LOOK, Shimano, or Speedplay cleats more inside or outside on your shoes can give you up to 5mm more or less width than setting them right in the middle. So the effective ranges are more like 50mm-60mm for most and 60mm to 70mm for the DUO-SHI.
This difference was much-discussed and me-thinks incorrectly judged negatively for the DUO-SHI when it first came out. Fitters I’ve talked to estimate that over half the riders they’ve worked on, those with the characteristics I cited above, need spindles longer than the common 53-55mm Q-factor of other power meter pedals. This short video segment from a Peak Torque review of the DUO-SHI explains this in more depth.
Oh, and if you also ride a gravel bike or mountain bike, know that cranksets used on those bikes already push your feet out much more than the 10mm or so difference you’ll get with the cleats placed in the middle of the road shoes you use with these power meter pedals.
If you are uncertain about what Q-factor is best for you and whether that should affect your power meter pedal choice, I encourage you to talk with your bike fitter. Your knees will thank you and your power output will be more efficient (aka higher) with the right width.
STACK HEIGHT – For shoes, stack height is essentially the combined thickness of your insole and outsole or the distance between the bottom of your foot and the top of your pedal. It’s important to know so that you can adjust your seat up or down a millimeter or two if you get a new set of shoes that have a slightly thinner or thicker combination of soles.
Pedal stack height works much the same way. It is measured from the height from the center of your pedal spindle to the top of the pedal body where it meets your shoe. The Favero and SRM measure 10.5mm, Garmin RK 12.2mm, POWRLINK 13mm, Garmin RS 13.5.
Again, these are differences that don’t matter to your performance once you adjust your seat height to accommodate for it. If you don’t they will affect your power output and comfort.
Note that if you are getting single or left-sided power meter pedals, you will get a right pedal and cleat with it that has the same pedal body and stack height. It just won’t have a power meter sensor installed in it. (Sorry, I should have mentioned that earlier.)
AESTHETICS – The pods on the Favero and POWRLINK gets others to comment that it looks “odd.” I don’t know what is said about the Garmin or EXAKT.
These are subjective views that don’t make any practical difference to the performance of these power meter pedals.
CYCLING METRICS – Garmin’s Cycling Dynamics is a suite of proprietary measures that provide additional information about your pedaling and power performance. They include metrics like right-left balance, pedal smoothness, torque effectiveness, seated/standing time, power phase, platform center offset. They are available on the Garmin and Favero Assioma power meter pedals but not with the POWRLINK.
While you may find some of these measures interesting, there’s not a whole lot you can really do with them. I’ve not seen anything published by training program providers, coaches, fitters, or physios that suggest you should do anything different with the data.
OVAL RING COMPATIBILITY – Some cyclists use oval rings to improve the effectiveness of their power stroke. Chris Froome is one of the more famous proponents. Oval rings can play havoc with power measurement. Favero and Wahoo claim to have developed approaches to get correct power readings from oval rings. I’ve not seen any independently developed data that verifies this.
No Differences
Finally, here are the important things they all do.
- AUTO START when you begin pedaling
- ZERO-OFFSET through your head unit or phone
- AUTOMATIC TEMPERATURE COMPENSATION during each ride
- CADENCE TRANSMISSION to your head unit
- USE SMARTPHONE APP for settings and performance metrics
- PEDAL/CLEAT ENGAGEMENT RANGE to allow for the right level of clip in/out tension
- LOW BATTERY WARNING sent to your head unit
********************
Thank you for reading. Please let me know what you think of anything I’ve written or ask any questions you might have in the comment section below.
If you’ve gotten some value by reading this post or any of the reviews or comments on the site and want to keep new content like this coming, click on the links and buy at the stores they take you to. You will save money and time while supporting the creation of independent and in-depth gear reviews at the same time.
If you prefer to buy at other stores, you can still support the site and new posts by making a donation here or by buying anything through these links to eBay and Amazon. Thank you.
If you’d like to stay connected, use the popup form to get notified when new posts come out and click on the icons at the bottom to follow us.
Thanks, and enjoy your riding safely!
“If you prefer TIME pedals, please let me know why”
the time platform has historically had 4 advantages:
1) contact surface between pedal and cleat is recessed, which ensures the foot is always parallel to pedal surface independent of cleat wear. this is a good thing for ensuring consistent maximum biomechanical efficiency (as a counterexample, walking on look cleats wears down its contact surface with the pedal in an irregular way. over time the plane of the foot will be at varying angles with respect to the plane of the pedal platform, reducing stability and biomechanical efficiency).
2) lateral as well as rotational float. easier for feet to naturally find their optimum position, which makes for better biomechanics.
3) lowest stack height. the original time system – the one with the 4 screw cleats – was head and shoulders above the competition in this department. this may have however changed since they moved to the classic 3 hole cleat system. haven’t been able to find recent and accurate comparisons of stack heights across all pedal systems.
4) large contact area between cleat and pedal, making them more comfortable and stable for efficient power transfer. as for point 3), there is a lack of recent quantitative comparisons so not sure if they still have an advantage here.
all these factors combined make the time pedal system very biomechanically efficient, stable and comfortable, though how much more so than current rival systems is difficult to establish in the absence of accurate quantitative data regarding the last 2 points above.
ferdinando
Ferdinando. Thanks. I know they’ve overhauled their pedal line recently, perhaps in part to overcome a reputation they had for poor reliability. Will take another look at them in the Spring. Steve
hi steve. reliability of time pedals was indeed an issue with the xpresso line, the first to use the carbon leaf spring. in my experience the new xpro is a solid improvement in performance, usability and longevity. the increased cleat contact area provides a noticeable stability and power transfer improvement (my racing bike has xpro and training one xpresso, i immediately feel the difference between the two). carbon leaf spring and hinge mech on xpro much more durable and less flaky than xpresso one. xpresso chassis has some very sharp edges that you can cut yourself on, xpro much more rounded.
another thing i forgot to mention about time pedals is the excellent ease of entry. the cleat lock spring is tensioned when you get out of the pedals, so only minimal down force is required to engage the locking mech. it’s a small thing, but once you try it other systems feel clunky by comparison!
ferdinando
Have had Assioma Uno for 8 months. I give them a 4 out of 5. My only gripe with them is, the pedals spin too much when you unclip. Whenever I stop, I’m forced to look to clip back in. If it’s not safe to do so, I struggle to clip back in and usually take more than 4 tries to do so. This is only a real issue when doing routes with a lot of traffic lights and stop signs. If they can fix this issue, they’ll have a 5 star product.
I second the recommendation of the Favero Assioma. I had the Garmin Vector 3 and felt like I was always changing batteries (not to mention the added cost and headache of constantly finding and buying the right batteries). The ease of charging and the battery life of the Assioma out weighs any added benefit or feature the Garmin has over the Assioma. Many find the pod on the Assioma big and ugly, but I found I never even notice the pod on or off the bike. The Assioma is what all other pedal based power meters aspire to.
Thanks for the thorough presentation of data. I do think you may want to scrub/update the Speedplay section. I think you wanted to say that Speedplay’s are “twice” and not “half” the cost. Also, my experience with SP is exactly the opposite on maintenance. I have my original X1 pedals from 1992-93, have never opened them and they spin great and my second pair fo X1s is over 10 years old and those have never been opened. Cleats usually fair well when I do not walk on them a lot and I get 5-8 years per set of cleats. Specs might have changed but these used to be the lightest available and have the lowest cornering clearance. And for the entry, I’m not sure what spinning or not is related to entry; my SPs do hold a position but it doesn’t matter for entry, you simply stomp down and it will fall flat to one side. The learning curve is actually shorter than the “toe-in” styles that you must engage the toe of te cleat before stomping down.
Tyler, Thanks for weighing in. Perhaps not the clearest English but the text says that the Speedplays “are at least half again the price of Shimano and LOOK pedals” which I think is accurate, at least for the more common Zero models. As to maintenance, I’m basing my comments on the current Zero line of road pedals which I own and use as my primary road pedal. I’m glad to hear you’ve had good luck with your X1s over the years. Speedplay themselves, however, recommend routine maintenance for their pedals that far exceed what is recommended or necessary for Shimano SPDs. I can easily tell by spinning them when they need to be serviced. As to cleat wear, results vary but even with the new cleat covers, I notice the wear just getting in and out of the pedals makes me need to replace them every couple of years or 10K or so miles. Don’t get me wrong, I love my Speedplays and find them superior over Shimano and Looks for a range of reasons (I have a separate post comparing pedals) but they take a bit more maintenance and cleat replacement than other pedal systems which I’m glad to do and pay for. Cheers, Steve
The stack height comparison above compares apples with oranges. The Speedplay numbers quoted – 8,5mm without an adapter, 11,5mm with an adapter – are from pedal axle centerline to shoe sole. The Assioma and Garmin numbers quoted – 10,5mm and 12,2mm respectively – are from pedal axle centerline to the cleat-pedal interface, and are therefore missing the cleat thickness to be comparable to the Speedplay numbers. The Assiomas use Keo-like cleats that are 7.4mm thick, so the Speedplay to Assioma comparison is really 11.5mm vs 17,9mm.
Furthermore, the statement “If you bought Speedplay because you can clip in on both sides, you’ve been had. A properly-greased Speedplay will not spin to give you access to both sides.” is wonky at best. Nobody is trying to “access both sides” of the pedal. The main difference in clipping into a Speedplay is that you simply step onto the pedal, with a high probability it will engage. Comparatively, on SPD-SL, Look and most other road pedals, engagement depends on placing the front of the cleat into the front of the pedal body, and then step in. Having used both types extensively, I can attest that the Speedplays are easier to get into – regardless of “clipping on both sides”.
Hi Steve
Do you have any updates about the release date of the Speedplay pedals that would come with a power meter? As I understand, they will launch them this summer, but no clues about the date.
Alejandro, I checked with Speedplay this week and they don’t have a release date as yet. As you likely saw, Favero announced on Instagram a “July” release (the month, no date) for their SPD-SL road pedal power meters. No price or other info. Steve
This is a newbie question as I am just researching the possibility of power meter pedals. You referenced “a head unit” a couple times in this article. Is this a cycling computer or something that comes with the pedals? I need to know what else I need to own in order to get usable data from the pedals. I currently cycle with a Garmin Forerunner 935 WATCH that tracks miles, speed, wind, calories but not RPM. I have to count for that but it is not hard to do every so often. I am looking at power meter pedals because I am also looking into training for longer distance triathlons than I have done in the past and most of the plans I have come across recommend knowing power information.
Renee, yes a “head unit” is a bike computer. You buy it separately. For power and cadence, you’ll need one that connects through ANT+ and BLE. I recommend the Wahoo BOLT. I review and compare it to the similarly-sized Garmin 530 here.
You can also use your phone and download one of many apps. It’ll connect via Bluetooth.
Steve, old duffer here and clearly a late adapter. I use SPD pedals on my road bikes. I was intrigued by the history of you buying a right sided unit when you broke you left leg and sometimes just leave the right pedal on your bike when you move the left unit to another bike. I have 2 road bikes and it occurs to me that getting the Garmin Rally dual sided set and putting one pedal on each bike would work. Any downside to using data in that manner? I wouldn’t need to by another set of pedals since I could just leave the extant, non-power pedal on the bike.
Mike
Mike, This isn’t something I’d recommend. First, the Rally doesn’t transmit power as a right-only pedal. Left and left-right yes but not in a right-only mode. What I was describing above and what does work is splitting the left and right Stages cranks. The 4iiii also work the same way.
But even if a right-only Rally or Favero or Wahoo Speedplay pedal setup transmitted power, I still wouldn’t recommend it. First, the stack height and q-factor dimensions are different between the non-powered and powered pedal models. This means your leg alignment would be off somewhat from where it was fit or, if you hadn’t gotten them fit what is working for you now. That might create some discomfort or even potential injury.
Secondly, unless you know that you are pretty close to 50/50, you are going to get power inconsistency from one bike to the next. Yes, if not set up to your fit requirements the same way, the bikes will contribute to power inconsistency but you’re not going to get the most out of training with or without power if your bikes are set up differently. Consistency in power measurement is more important than absolute power accuracy. What I was describing was having the right crank on my road bike and the left crank on my gravel bike. There is no consistency in power readings from road to gravel and knowing that I was typically 48-52 or better, at least I was getting consistent readings that were reasonably close to being accurate when I was comparing rides on the same surface.
Pedals are about the quickest thing to switch between bikes. Should take you no more than a few minutes. But if you don’t have the patience for that, I’d suggest you get a left-side Stages (or 4iiii) crank arm for each of your road bikes. While not ideal, I’d expect left-side crank arms from the same manufacturer would be more consistent than left and right cranks or pedals if you have some imbalance between those two legs. Also, crank arm power meters are less expensive than pedal ones and left-side power crank arms are less expensive than right-side ones. With many cranksets, the lower priced left-side cranks like a Shimano 105 has the same fitment to the crankset as the Ultegra or Dura-Ace. The weight will be a little different, but that won’t be noticeable or affect your consistency if you use the same left-side crank arm on each of your road bikes.
You can read more about crank arm power meters or give Josh at Power Meter City a call. Steve