BEST POWER METER FOR ROAD CYCLING
Over the last couple of years, there has been a lot of activity in the power meter world focused on bringing more for less to road cycling enthusiasts like you and me. Many new small and start-up companies have gotten in while several larger and established ones have completely remade their product lines. More power meters have been introduced for more compatible and transferable places on your bike. New tools have been developed and offered to analyze more and more aspects of your cycling mechanics in addition to your power output.
We’ve also seen the price a cyclist can expect to pay for a power meter drop in half. New companies have jumped in at the lowest price end often with simpler yet still well-performing products trying to attract the larger group of regular, enthusiast level cyclists who would never consider using a power meter before mostly because of its price and elite athlete focus. Established power meter providers have dropped their prices and offered less featured, lower-priced model options to compete.
Since many of us roadies prefer to spend more time riding than reading, I’ll pause the story here and give you my bottom lines. After that, I’ll tell you in detail what I’ve found should matter (and shouldn’t) to enthusiasts when choosing between power meters, how I chose from over 20 proven ones and which are the best.
WHAT YOU NEED TO KNOW
Click on any red statement below to go directly to that part of the post. Click the back arrow to return to this list.
Enthusiasts don’t need the same power meter elite athletes do to reach their goals
Proper training is key to getting value from any power meter
Power meters for cycling enthusiasts need to meet four requirements… more is unnecessary
There are currently over 20 established and proven bike power meter products
Comparing groups of power meters by location helps come up with a short list to choose from
I recommend three bike power meters for road cycling enthusiasts
Here are the links to best prices for proven and established power meters
THE RAPID GROWTH OF NEW POWER METER OPTIONS
There were probably 3 or 4 independently proven, widely available and well-supported power meters that had a broad base of user experience to draw from when I started training with power 10 years ago. There were 6 when I last did a complete review in 2014.
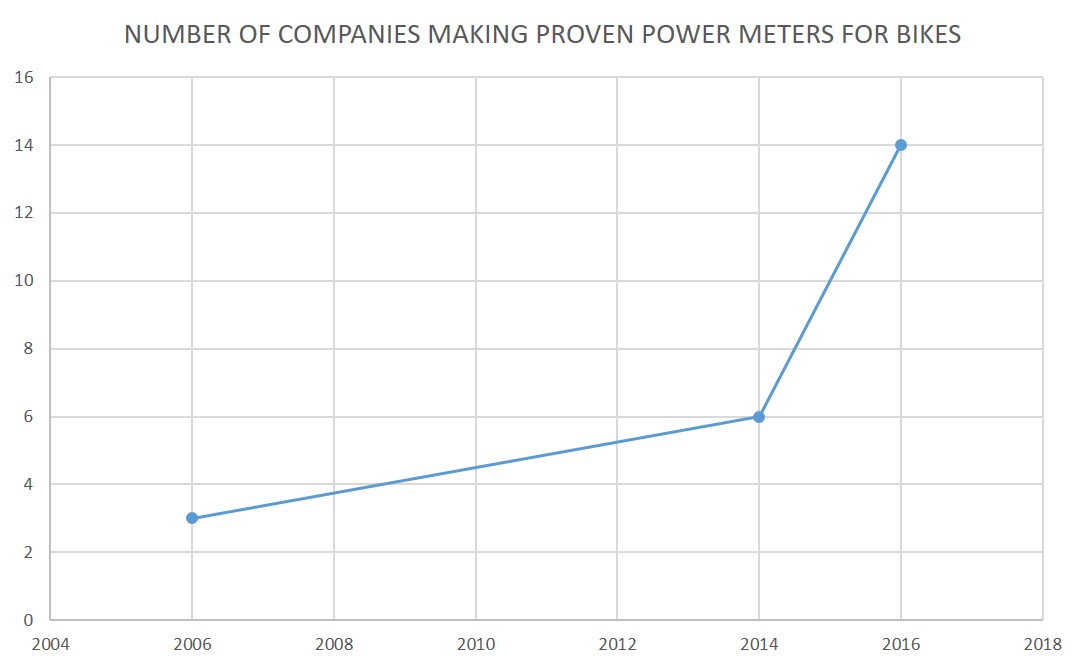
The number of companies offering proven power meter options has spiked in the last few years
Now, I count 14 companies that are actively selling proven power meters, many with a few different models. Three of those companies were selling models back in 2014 but they were yet to be proven. Another three are brand new and have crossed the threshold to proven, widely available and supported status in just a couple years. Two others were all of that back in 2014 but I didn’t consider them because of their technology.
(When I say proven, I’m not saying good or bad. It’s just that we now know their level of performance based on independent tests and user experience after enough people and enough time to establish what their performance level has proven to be.)
Four of the 14 companies are also now producing and selling next generation or complementary models that are going through independent testing and first customer evaluation. Two more companies are at the same stage with their first power meters. Finally, there are another 9 companies new to the game that have announced but are not yet making their first power meter products.
Whoosh. What should we make of all this?
Clearly, with so many new, lower priced, fully capable power meters, it’s clear that the power meter companies have turned their attention to a bigger market. That would be us, my fellow road cycling enthusiasts. Stages Cycling was one of the first to design a simple power meter for enthusiasts that did everything we needed and was priced like a set of alloy upgrade wheels. They proved the market was there when they started selling a left crank arm power meter in 2013 and in the next years reportedly surpassed the sales of all the other power meter makers combined. From there, the rest have rushed in.
Yes, the apparent needs of pro racers, triathletes and trackies, elite amateurs, cycling gear geeks and rich boys wanting ever shinier toys for high spec, high priced power meters are still being served with existing power meters and even brand new, high-end products dedicated for their use. But, almost all of the new power meter development and products today are focused on cyclists that have recently answered yes to the question posed in my post Should You Start Training Now With A Power Meter? While I take no credit, new power meter users made up mostly by enthusiasts, are now driving the sales, product design and capabilities of most currently available, in-testing and recently announced power meters.
Of course, that’s all potentially interesting to you (or not), but the key question really is: How much of all this activity in the power meter world is actually delivering products we enthusiasts should go out and buy and how much is just a lot of smoke without fire? Put it in cycling terms, how much of all this pedaling is turning into power or just higher cadence?
Arghh. I’m terrible with metaphors but I hope you get my point.
If you are looking for a comparative list and discussion of the capabilities, features and specs of various power meters followed by a lot of equivocation as to what to buy, you won’t find it here. You can get that from the cycling press and the “first-look” reports or buyer’s guides that list all the specs and tell you what they like or don’t about each but won’t help you choose between them.
Instead, I’ll focus in on the results (fire, power) rather than the activity (smoke, cadence), the things you need to know to help you decide between the small handful of power meters that my analysis concludes are best for road cycling enthusiasts. I’ll also tell you which is the best performer for enthusiasts, which is the best value and which is the best one to buy if you want to expand your power meter for more data later. This should help you feel both knowledgeable and confident about the power meter you buy.
ENTHUSIASTS AND POWER METERS
If it’s not clear yet, let me make this point abundantly so. I write and review products for use by road cycling enthusiasts, aka regular roadies, the serious, committed cyclists who typically ride 2,000 to 5,000 miles or 3,000 to 7,000 kilometers a year, 4x to 6x/week, through much of the year (inside when not outside), covering all sorts of terrain, at decent speeds (averaging in the high teens mph, high twenties kph and up), and typically do some events including group or club rides, charity events, endurance rides, and the occasional low to mid-level amateur races or other types of ‘competitive’ rides. We own $2500-$10,000 modern composite bikes and track our performance with bike electronics, apps and software.
While some enthusiasts race, I am not reviewing and recommending power meters in this post that are best for elite level or dedicated amateur road racers and triathletes or riders with coaches. Nor am I recommending the best power meter models for recreational riders, weekend warriors, cyclocross, gravel or mountain bike riders. I’m reviewing the same power meters available to riders of all types but my reviews and recommendations are targeted to the training, goals and gear of my fellow road cycling enthusiasts.
Some reviewers will say it’s hard to pick the best power meter, it depends on so many things and that you should fire your reviewer or bike shop for recommending one without you going through some deep situational and budget analysis. Well, I’m not reviewing or recommending power meters for all stripes of cycling consumers and when it comes to enthusiasts, our needs and situations and spending targets are far more similar than different.
Further, giving you the pros and cons of a dozen or more power meters without putting that information into some relevant decision framework (and I don’t mean an endlessly long spec sheet) to help you pick one is kind of like guiding you up a creek and then taking away your paddle. You’ll just drift back to the beginning, hit a few underwater obstacles along the way and accomplish little in the process.
Said more simply, you shouldn’t have to go through what one commenter wrote me recently…
As enthusiasts, we use various “tools” that fuel our passion but don’t overwhelm it to the point of obsession and ruining the fun that is core to our ethos and the consistent riding that keeps us going. The tools we use – certain types of road bikes, wheelsets, components, clothing, electronics, etc. – are central to help us achieve our goals and keep us curious and informed about how we are doing along the way.
Elite athletes, full-on amateur racers, triathletes, and coached riders are often willing to spend extra (or are sponsored) to get the bleeding edge tools where the performance benefit is incrementally or debatably better than far less expensive gear. Most enthusiasts are dedicated riders but won’t spend extra money on gear without a tangible and significant performance benefit. We may occasionally race, measure ourselves against friends in KOMs, train and buy gear to get better but there’s a limit to the time, budget and level of focus that separates us from the elite pro and amateur athletes. The challenge for us roadies is to separate out the performance reality vs the hype and then decide how much we are willing to pay for each level of real, added performance.
When it comes to power meters, most enthusiasts have held back for years, unwilling to spend $1500-$2500 on a power meter that elite athletes (and their coaches) felt was necessary to get training and performance benefits. That price range was a non-starter for the regular roadie set, stopping us from crossing the threshold to gain the benefits of training with power.
Once power meters broke through the $1000 barrier and bike computers and training apps were all working in sync, using the same ANT+ communication protocols and displaying the same basic power measurements, those of us who already knew about power meters and their benefits started to jump on board in bigger numbers. To wit, the rise of Stages and the rush of new power meters and low power meter prices to compete for the large underserved market of road cycling enthusiasts.

The original Stages power meter circa 2013. The product that opened the gates for enthusiasts?
As more power meters get closer to, and even below, $500 now, more and more enthusiasts are getting curious about them and seriously considering getting one. From what I’ve seen, there’s still a lot of basic learning and guidance many enthusiasts need about how to train with a power meter to make the purchase of one truly worthwhile, but we’re more open to getting up that learning curve at these price points and realizing the benefits.
So power meters are now on the table for consideration by enthusiasts and we want answers to the same basic questions we ask about other gear, specifically:
How do I evaluate them?
What do I need from them to achieve my goals?
Which are the best for me and my money and why?
I’ll go through each of those questions in the sections that follow
HOW TO EVALUATE A POWER METER
In all my reviews, I evaluate enthusiast cycling gear and suggest you do too based on four groups of criteria with more weight placed on Performance and Cost criteria. Design (including specs and features) can contribute to performance but doesn’t determine it. In the case of power meters, Design is also about usability and capabilities, some of which are critical and others unnecessary for enthusiasts. Quality is first a go/no go consideration for me. Beyond that it can be a measure of product longevity that affects cost of ownership but not performance.
For power meters, the criteria in each of those categories are as follows:
Performance – Accuracy, consistency, data dependability, functionality, and battery life.
Design – Measurement location(s), compatibility, ease of installation and transferability, interface with cycling computers and measurement software/application, ease of use including start-up, torque zeroing and temperature compensation/calibration, unit weight, firmware update-ability, and communication protocol (ANT+ or Bluetooth or both).
Quality – Product maturity, reliability, dealer/parts/service infrastructure and support, repair service, warranty, service life, and company long term viability.
Cost – Unit purchase cost net of any new or removed computer, cranks, chainrings, wheels or sensors to make the PM functional in your existing or planned bike/wheels/chainset set-up(s), and any maintenance or service costs as measured in your currency, amount of hassle or lost time using your power meter.
WHAT PERFORMANCE AND DESIGN DO ENTHUSIASTS NEED?
I’ve not seen much debate or recommendation about what road cycling enthusiasts really need from power meters. Coaches will tell you what reports they want to see from your power meter but most enthusiasts don’t have coaches. That leaves us hanging on the last article we read written by a coach of all levels of athletes or the reporter that quotes a handful of company spokespeople representing a range of views without separating the wheat from the chaff. Or we try to take some wisdom from the forum writer who bought a power meter and raves about what a great purchase he made.
Worse, many of us analytical types end up scratching our heads trying to figure out what the relative value is of all the product specs and features that companies market the crap out of to set themselves apart but that may or may not matter to us non-elite cyclists (and even the elite ones).
So, based on the research I’ve done and the experience I and others have had, I’ll put an unvarnished stake in the ground on this topic. Oh yeah, there’s a lot that went into this stake, but I’ll take you right to it rather than try to impress you with the journey I took to get there.
Proper Training is Key to Getting Value from Power Meters
As enthusiasts, we ride and train to build and maintain certain levels of speed, distance and strength. We apply these abilities in situations ranging from individual rides where we test ourselves against past times or the performance of others, in group rides to do our turns leading the pace line (or just keep up with a fast group), or in events we do during the year from a century or other distance ride, a road race or criterium, a time trial, an alpine climb, even a vacation with a series of back to back days of different types of riding.
(If you are an enthusiast that prefers just to ride often along a handful of routes on your own and with friends, and you don’t plan to train to any goal or try to improve your performance, that’s totally cool. Don’t bother getting a power meter, though. It might give you some interesting information, but it won’t help you ride any better.)
Gone are the days when training meant just going out and riding more times a week or doing more distance or trying to go faster each ride to reach your goals. That’s not training. If you were a runner and wanted to sprint faster or do a better half marathon, would you just go out and sprint over and over or run long every day trying to go a little faster than the day before?
Of course not. It’s the same with cycling.
If you want to make improvements, every day you ride you should be riding with a specific ride plan that is part of weekly, seasonal or perhaps longer-term plans and goals. Some days the plan calls for you ride hard; some days it says you should ride easy. On your harder days, your plan might call for you to do flat speed intervals or hill repeats or longer stretches or a group ride, each at defined effort levels.
You measure your effort during and at the end of each ride to see how you are doing against your plan and goals and on the path to your longer-term goals. And the best way to measure your effort is to use a power meter, far better than your heart rate, speed or perceived level of effort.
A few weeks from a good training plan (that was poorly executed!)
For example, your training plan might call for you to do intervals within a certain watt range that equates to your threshold or zone 4 power level one day. On another, the plan might be to keep your hill repeats within your VO2/zone 5 effort level. On your “rest days,” the plan might be for you to ride but not let your power reading go above the active recovery/zone 1 or endurance/zone 2 level. Looking at your bike computer during those efforts, you monitor your watt readings and increase or decrease your effort to keep your power in the zone called out by the plan.
On days when you do group rides or events, you might look at your power during the ride to make sure you are keeping the effort or power reading you’ve been trained to ride at so you don’t blow up or go to easily. After you finish, you can review some of the key power data for the ride like your Normalized Power (NP), Intensity Factor (IF) and Training Stress Score (TSS) to see your progress overall and tweak your day to day training as appropriate. More on these terms here.
If this kind of training is new to you or you’ve done some of this but want a complete plan to suit your own fitness targets, upcoming event goals and available time without having to hire a coach to draw a plan up for you, there are a lot of good resources around.
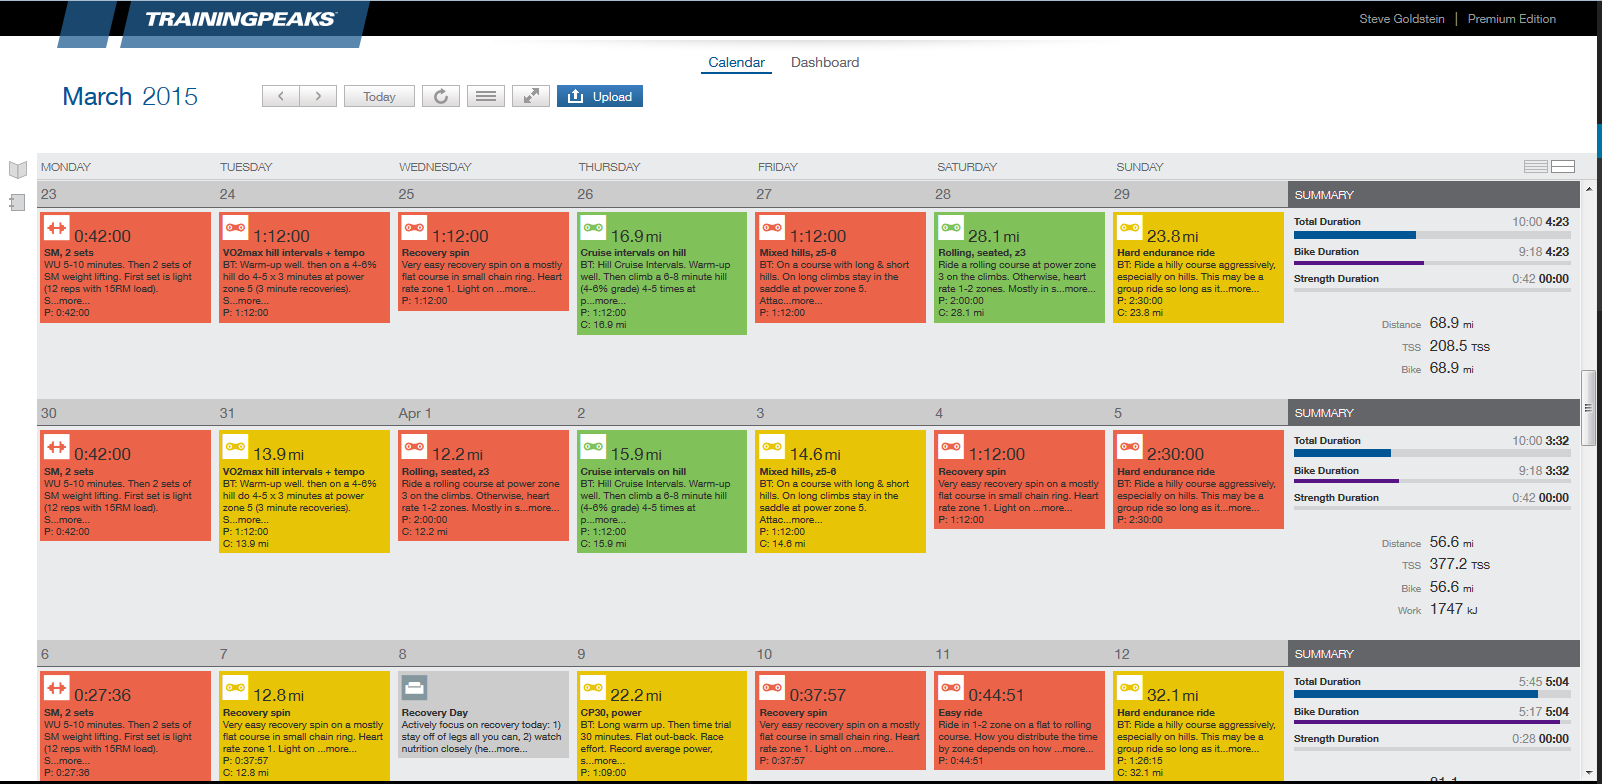
Check out the training plans offered by Training Peaks probably the leading site for training workout measurement and analysis and by Hunter Allen and Joe Friel, two of the leading innovators in cycling training. Allen and co-author Andy Coggan wrote Training and Racing with a Power Meter which laid the foundation for much of what everyone is doing now with power. Friel wrote The Cyclist’s Training Bible, the original and still the best resource I’ve ever read on endurance training and Fast after 50 for those of you who want to keep improving despite your age.
Today’s Plan, another training and workout analysis site, generates custom plans for you after asking questions about of your goals, strengths, weaknesses and time availability. If you are planning to ride on a trainer and benefit from video and music to keep you going, the Sufferfest offers a range of training plans that sync up their cycling videos and to several smart trainers that alter your power levels to suit the plan. For me, this is the only way to go for indoor training.
If you are into Trainer Road or Strava or are a member of British Cycling, all have training program resources you can access though they are more limited than the ones above.
What I will note is that many enthusiasts have a power meter but don’t train to a modern plan or any kind of plan at all. This renders their power meter a useless and expensive toy. Others seldom even zero offset their power meter. This makes it a misleading tool.
Those who pour over power meter specs, debate independent leg vs left leg measurement and choose between units based on various features but don’t train to a plan or regularly zero offset their power meters are really fooling themselves. Don’t be that guy or girl.
Power Meters for Enthusiasts Need to Meet Four Essential Requirements… More is Unnecessary
For the kind of goals we enthusiasts set and training we should do, your power meter must:
1. Provide proven and dependable consistency; the accuracy of your absolute power is less important.
2. Be easy to use and provide the essential data for training that you can access during and after your ride and that you can use without the need for someone else (like a coach) to tell you what to do with.
If you regularly use more than one bike or set of wheels or chainrings, your power meter must also:
3. Be easy for you (not a mechanic) to quickly transfer or use in whatever combination of bikes, wheels, and chainrings you regularly ride.
4. Provide you the same dependable consistency at the same accuracy level and be equally easy to use and access your data no matter what combination of your regular gear you are riding.
That sounds rather straightforward but it’s far from simple for a power meter to pull off. Based on those requirements, you will see in the sections below that I have eliminated many power meters as I went about determining the best ones for road cycling enthusiasts. Many of these power meters are new to the market and have not yet met these requirements, something not unusual for power meters. Others have been available for several years and just haven’t proven to get over the performance hump or aren’t designed to meet the requirements I laid out above.
A power meter’s accuracy in measuring your absolute power is important for sure, but not near as important as the confidence that dependably consistent power meter readings give you and allow you to see the progress you are making. Said in numbers, it matters less that one power meter reads your power at 240 watts and three others read it at 250 watts than if the first one consistently reads your power at 240 +/- 3 watts for the same level of effort and the other three read it at 250 watts +/-10 watts.
If the power meter you use meets the four requirements I’ve stated above, it is unnecessary to spend more on another one that also does.
It is irrelevant to your training as an enthusiast how many and what type of sensors your power meter has, how it measures the power and whether the power it measures comes from just your left leg, your left and right leg independently, the power created by both legs together or not from your legs at all. It also hasn’t been shown what value information about your pedal stroke or so-called “pedaling mechanics” provides, if any at all. All this information is extra, potentially interesting but not useful (and potentially harmful or at least a distraction) for most enthusiasts in altering your training or achieving your performance goals. It is what drives the marketing and hype around some power meters these days and many riders and reviewers have fallen for it. I urge you not to.
Where the power meter is located (shoe, pedal, crank, spider, chainring, axle, hub, bars, strap) is only relevant to your ability to choose one compatible with your bike(s) and easily and quickly transfer between the set-ups you ride while still providing you essential power data and access to that data. No location gives you better or more useful information just because it is located there.
If you want to spend your money on added (but not essential or even useful) capabilities or location or measurement preferences, go for it but it’s not going to change your enthusiast training program, how you use your power meter and how well you achieve your performance goals. Added accuracy, different measurement approaches and locations, and pedaling or stroke mechanics information has debatable value even for elite cyclists now. Coaches haven’t shown the value and only a few have developed approaches to see if they can use this added capability to improve the training and performance of their elite cyclists.
That may change in the future and let’s hope it does. We’d all like to train smarter and toward higher performance levels. But after several years of having this added accuracy, independent leg measuring and pedal stroke charting capability, we don’t appear to be any closer to getting any extra value from the extra information that actually helps enthusiast level cyclists train to reach their goals.
There may be some benefit of independent leg power measuring to improve your bike fit. Your fitter will have such a power meter to help him or her fit you if they think that is important.
Of course, that doesn’t stop the debate. Here’s an article from Cyclist that airs the opinions of several power meter providers and coaches on each side of the debate. Interesting but clearly not conclusive. Worried about having an uneven pedaling stroke? Don’t. Everyone’s is uneven to some degree but for most, it’s minimal and unchanging. Trying to change your stroke balance may hurt you more than help you.
Worried that you don’t have a good pedal stroke in the first place or that it gets sloppy over the course of a long ride? You certainly can work on improving your stroke by reading up and practicing the four-stroke stages. The simplest way I’ve found is to periodically put my bike in a trainer and ride with the Sufferfest video called the Elements of Style (available only by subscription). Beyond working on your stroke, it also takes you through how to engage different muscle groups and get your body in optimal position, all of which work together to maximize your power. As the Brits would say, it’s “brilliant”.
You can also remind yourself while you are out on a ride to keep pedaling with as complete a stroke through those stages as you can using the right body position and muscle groups, especially as you get further into a ride and tend to tire. But go out and spend twice what you need just to have your power meter tell you to improve your stroke and keep at it as you fatigue through a long ride? I just told you how to do that and saved you a ton of money.
WHICH POWER METERS ARE THE BEST FOR ROAD CYCLING ENTHUSIASTS?
Now that I’ve set a bar, a required level of performance and design requirements for enthusiast power meter selection, let’s look at what’s available against those requirements. With so many new power meters out there, I want to make sure that what I buy helps me meet my training and performance goals and doesn’t just have attractive features.
Perhaps because of its combination of mechanical and electronic requirements, power meters seem to be one of the more difficult pieces of cycling gear to get right. Unfortunately, many haven’t gotten it right. Some get announced and never introduced. Some get introduced on a limited basis and never work once in volume production. Others seem to work at first but flaws develop or are exposed over time and the companies can’t keep up with the mechanical or electronic improvements needed to keep them viable.
Fortunately, there are independent reviewers and users who are willing to buy into the bleeding edge of technology and report their experience in reviews and the comments that go with them. Between them, the testers at DC Rainmaker, BikeRadar, Slowtwitch and several bloggers have done us all a great service by doing extensive long-term testing for accuracy and consistency and other aspects of the performance of the power meters I’m trying to help you choose from in this post.
Users also give feedback directly to power meter companies through forums set up to flag issues and product improvements to address them. Some power meter companies have abused their customer’s goodwill by having the first users of their production volume power meters be paying customers rather than paid or volunteer testers. So the entries on these forums can be quite brutal as well as honest.
Unfortunately, this way of doing business – selling product that needs more testing before it should be sold – has come to be generally accepted by power meter early adopter customers looking for new products at ever lower prices. This approach to new product development is not atypical of what you see across the world of high-end electronics products in general and power meters are essentially electronics (or at least electro-mechanical products).
It would be unacceptable for most bike products including electronic shifting systems to come onto the market with the amount of additional development work that new power meters often still need after they are introduced. Fortunately, a faulty power meter may cause you to kick yourself for buying it but doesn’t by itself pose a safety hazard when it doesn’t work on a ride.
Where does that put us as enthusiasts? If I’m going to put down several hundred to over a thousand dollars, pounds or euros for a product, I want it to work. Perhaps some readers are willing to ride that early adopter bleeding edge to save some money but I’m not going to recommend you buy a power meter that hasn’t worked out the considerable number of bugs that come with most newly introduced ones.
In the power meter world, that means most products need enough use in a range of conditions in long-term testing across a good number of users willing to provide feedback after it’s in production before it’s sufficiently improved to be ready for most enthusiasts. This usually translates to a year or two and often the release of a version 2 of the product before you know what you can reliably expect from it.
Recognizing that reality and to sort through all the power meters that are in various stages of their product maturity, I’ve put all the ones I’m aware of into three groups:
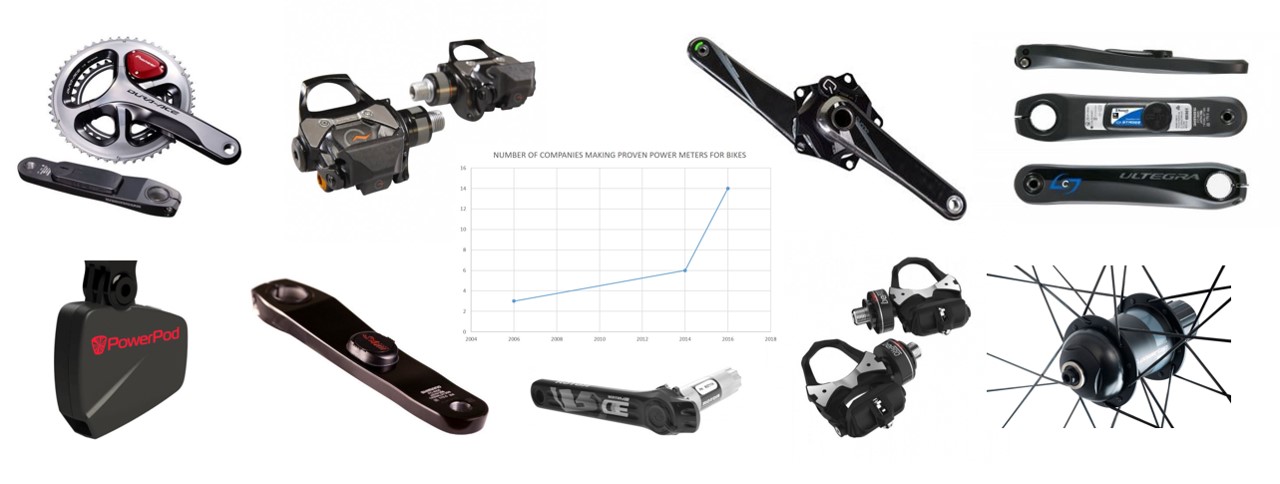
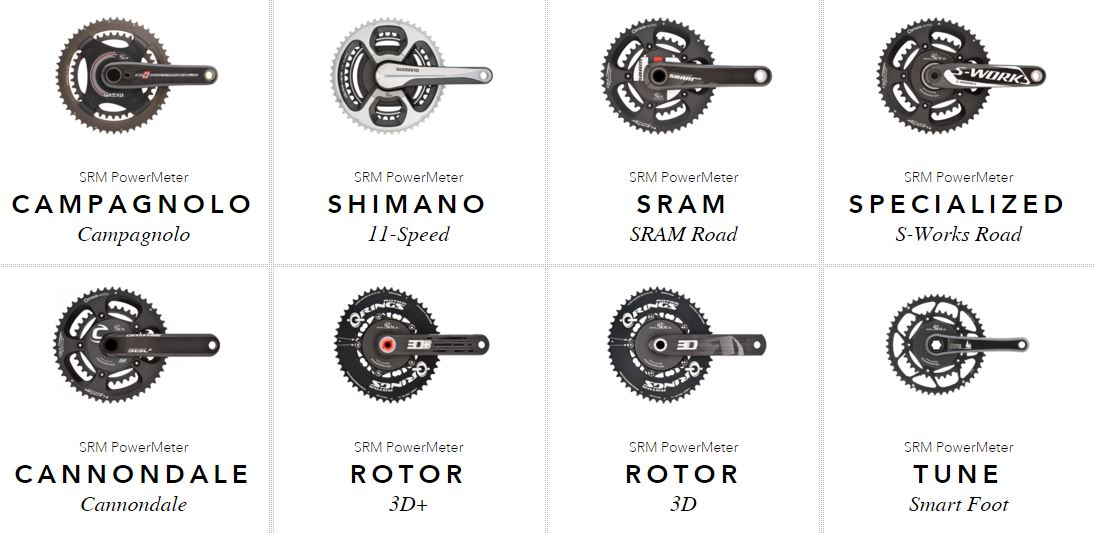
A. Established and proven – Power reading accuracy and consistency levels (good or bad) have been established over time and through long-term independent tests and with extensive customer feedback; products have been reliable and durable over time; they are distributed to and supported in the major regions of the world where enthusiasts ride.
- Pedal – Garmin Vector 3, Favero Assioma, PowerTap P1, Polar/Look Keo Power System
- Arm – Stages, 4iiii Precision and Pro, Pioneer Power, Verve Infocrank
- Spider – SRM, Quarq DZero and DFour, FSA PowerBox, PowerTap C1
- Axle – Rotor INPower
- Hub – PowerTap G3/GS
- Bar – Velocomp PowerPod
- Strap – PowerCal
B. Available but not yet proven – Power meters are in production and being sold in at least some major regions, perhaps having good initial reviews, but are not yet proven through independent long-term tests and by users to be accurate, consistent and/or reliable over time. These include:
- Pedal – Look KeO Power
- Arm – Watteam PowerBeat
- Spider – Power2Max NG and NG-ECO
- Axle – Rotor 2INPower
- Shoe – RPM2
C. Announced but not currently available – Sounds good, perhaps even look good in initial tests but not currently in production and a proven level of performance has certainly not been established. Some recalled and being reworked after an initial period of production and sales.
- Pedal – Xpedo, Limits
- Crank Arm – 4iiii Precision Podium, Team Zwatt
- Spider – Shimano 9100-P, Team Zwatt
- Axle – Team Zwatt, Dyno Velo, Ashton Instruments
- Shoe – Luck
For the rest of this review, I’m going to focus on the “A. Established and Proven” power meters with perhaps a just a few words on those in groups B and C. I’m not part of the hype machine. I don’t have any advertisers to satisfy by increasing the number of site clicks with product release announcements and “first looks”. Nor do I feel the pressure to review any company’s power meter just because they send me one to test or are promoting it in the cycling press. Life is too short. I don’t want to steer my fellow enthusiasts to a power meter that hasn’t been proven or that has proven inadequate or oover-designed for road cycling enthusiasts’ needs. I’ll add to the A group, update this post and revisit my recommendations once those in the B and C groups are established and proven.
In the “Elimination Rounds”, I’ve picked one power meter from the A group at each bike location that is the most qualified against the enthusiast performance and design requirements and has the lowest cost to move into the “Finals.” There, I’ve compared these finalists and picked a Best Performer, Best Value and Best Expandable power meter.
ELIMINATION ROUNDS
Pedal Power Meters
In this group of power meters that are integrated into one or both pedals, the Garmin Vector 3, Favero Assioma and PowerTap P1 are established and have proven what they can do. The Polar/Look Keo has as well but only works with Bluetooth bike computers and watches so I’ve effectively eliminated it as ANT+ is the overwhelmingly dominant sensor and computer protocol for cyclists. The Look KeO is a significantly revamped but not yet proven successor to the Polar/Look. Xpedo and Limits have announced pedal power meters but they are not available.
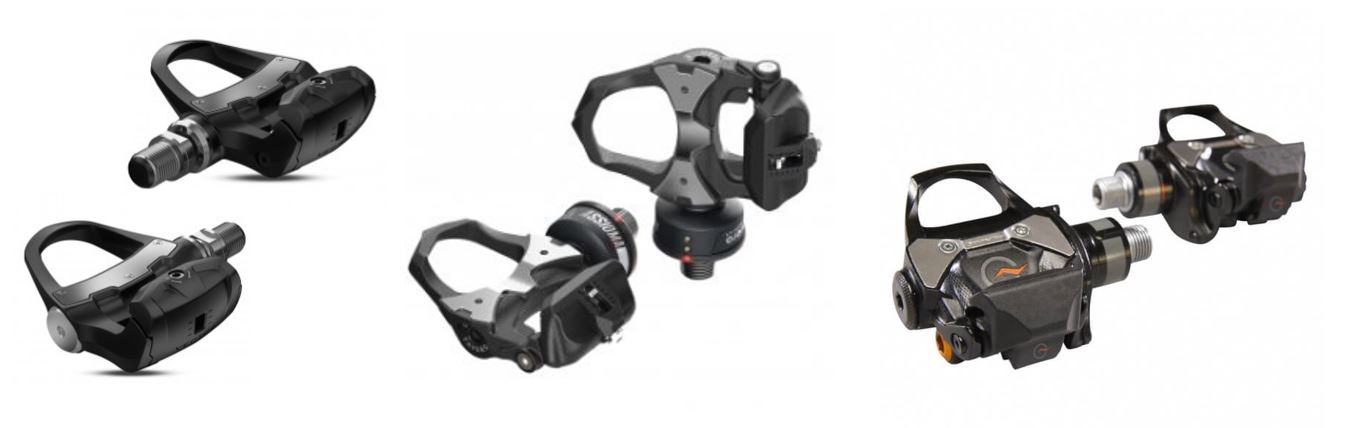
Garmin Vector 3 – Favero Assioma – PowerTap P1
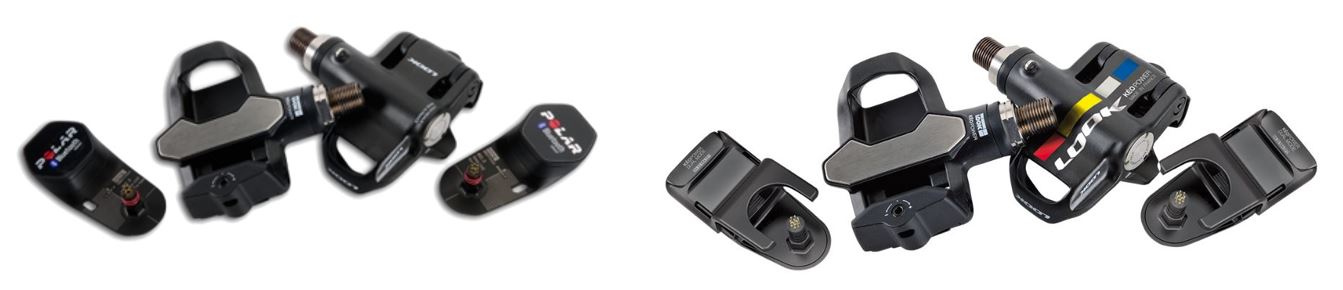
Polar-Look Keo Power System and Look KEO Power Dual Mode…. separated a couple of years after birth….
At first glance, the major advantage of buying a power meter that is integrated into your pedals appears to be their broad compatibility, easy installation, and quick transferability from one bike to another. In a couple of minutes and with only a simple tool, you can transfer the Vector 3, Assioma and P1 pedal power meters between just about any two road bikes.
On the other hand, if you don’t think you are compatible with the Look KEO style pedal used by all of these power meters, you should probably scroll ahead to the next section.
Before you do, however, ask yourself if the value you place on power meter transferability is high enough to consider adopting a new pedal platform. While their performance differs, Shimano road pedals are very similar in design and functionality to Look ones. Speedplay, the other leading road pedal, has some different functionality and more fit flexibility than Look pedals but isn’t so radically different that most people can’t easily use either.
While I’ve ridden many more miles on Shimano SPD SL and Speedplay Zero pedals and prefer them over others, I’ve had no difficulty and no complaints about riding the Look Keo style pedals that have these power meters built into them.
The opportunity to expand them from single to dual-sided power measurement (Vector 3 and Assioma only)also looks attractive if or once any true training or performance value is found for enthusiasts (or even elite athletes) from having independent leg power data, other than recovering from injury or dealing with biomechanical issues.
Depending on the model, left pedal power meter models are generally competitively priced against most of the established and proven left crank arm based power meter. The independent L/R measuring pedal power meters are similarly priced or less expensive than many independent leg or total power measuring meters placed elsewhere on the bike.
What’s changed since the last review of power meter pedals?
Before I updated this review for the current Garmin Vector 3 and the Favero Assioma models, I started this next paragraph with a big “but”. I followed that but with a half dozen paragraphs about performance concerns surrounding the prior Garmin and Favero models and the high prices for all the power meters in this category that rendered them non-competitive against power meters in other categories.
The PowerTap P1 worked well but was way overpriced and seemed to eat batteries as fast as I eat cookies. The Vector 2 power readings spiked and dropped out, took longer to acclimate to temperature than other power meters, and required you to tighten the pedals to a specific level with a torque wrench. And, I won’t even get into those hanging pods which bothered so many people.
The Favero bePRO, the predecessor to the Favero Assioma, took a few rides to “settle in”, a euphemism that meant the data from the first 2-3 rides after you transferred the pedals from one bike to another was useless for training. They also needed to be installed with alignment templates. The lure of transferability was a mirage. The size of their pods also interfered with some shoes that had a wide forefoot shape.
Well, a lot of that has changed with the new model introductions. The Vector 3s lost the pods and have shown no abnormalities in testing. The Assioma require no settling in per my testing and have smaller pods that are no issue on my wide Specialized S-Works 6 shoes and I’d expect others. Using a torque wrench and aligning the pods is no longer required. And the prices of the Vector 3, Assioma, and P1 have all been reduced (more on this later).
With these product and price changes, and with the consistent performance these three pedal power meters produce relative to others, you could make an argument for buying them against any other power meter if you are ok with the pedal platform, even if you don’t have another bike to transfer them to.
Testing I and others have done show the consistency and accuracy performance of these three powers meters are all good and the data coming from them was dependable (eg., no dropouts). We tested for issues that plagued the previous Garmin Vector 2 and Favero bePRO models and found them no longer issues.
The current Vector 3, Assioma and P1 models all function pretty much the same. Before your first ride after you’ve bought or transferred the pedals, you screw in and tighten the pedals. I find hand tightening is about all you need but all three companies recommend you snug the pedals down another half turn or so. The Vector 3 requires a pedal wrench; the other two only need a commonly available, long arm, 8mm Allen wrench (which comes in the box with the Assioma).
Here’s an installation demonstration:
As with any other power meter, you then pair it if it’s your first time, set your pedal lengths and make whatever other setting adjustments you want. Clip in, ride for a few hundred yards/meters, zero-offset and off you go. They all automatically compensate for temperature changes during your ride.
This is probably as good a time as any to remind you that you want to zero-offset nearly every power meter at the beginning of each ride regardless of the type of you are using. If you don’t, there’s no guarantee that it will read consistently with the last time you did.
Zero-offset is an easy process for most power meters. But your bike outside for a few minutes for it to come to ambient temperature while you put on your shoes, helmet, etc. Turn on your head unit, wake up the power meter by moving whatever it’s attached to, move the pedal or crank power meters into the prescribed horizontal or vertical position and push the zero-offset button on your head unit when it asks you to. Within a few seconds the zero-offset is done and off you go on your ride.
If this is the first ride since you transferred your power meter from another bike or you didn’t have a chance to put it outside for a few minutes before you jumped on, ride it for a few hundred yards/meters to make sure everything is on tight and at temperature before you do your zero-offset.
The battery life and source are different on each unit. Assuming you ride 10 hours/week, you should get about 6 weeks out of the Assioma and P1 and about twice that from the Vector 3. Six weeks of riding between charges is plenty for most enthusiasts. I find I charge my computer and lights about once a week and my Di2 about once every 3 months.
The built-in Assioma batteries are rechargeable and use connectors that easily attach to the pods and are secured with built-in magnets.
The P1 pedals use AAA lithium batteries – not the typical AA Ni-Cad ones that go in kids toys and most everything else. Vector 3 pedals use LR44 coin cell batteries – not the more common CR2032 used in other bike power meters (e.g., Quarq, Stages), watches and the like.
While you can find these batteries online and at many stores, they aren’t the kind of batteries you will dependably find at gas stations or smaller convenience store rest stops along your ride. You can buy a bunch and easily carry a couple of extras in your saddle bag to pull out when those in your power meter are running low. You can’t, of course, recharge your Assioma en route.
Both the P1 and Vector have screw-on caps to get access to the batteries, something that hasn’t been an issue with water ingestion on these units. They all use ANT+ protocol, the one you should use to communicate with your head unit rather than the weaker signal Bluetooth. All of these power meters also have temperature compensation.
Combined, the two Powertap P1 pedals are about 100g heavier than the Garmin Vector 3 and about 130 grams heavier than the Assiomas. The Powertap also look quite chunky and the Vector quite slim with the Assioma somewhere in the middle. These are design aspects, however, and neither will affect your performance (unless you let it get into your head).
From a quality standpoint, while the Vector 3 and Assioma are new models, both Garmin and Favero, as well as PowerTap, have proven they make reliable products and have good customer support. They each have two-year warranties.
If the pedals are roughly on par based on performance, design and quality criteria, how do you pick between them?
Ah, it’s nice to be your own straight man.
The answer, of course, is price.
The Assioma and Powertap are a good deal less regardless of whether you plan to buy the dual or single sided version. If you start with the single sided version and decide you want to go to a dual setup later, the Assioma still costs less for that combo.
With little to separate the performance, design or quality of the Garmin Vector 3, Favero Assioma, and PowerTap P1, the Vector’s higher price knocks it out. Comparing the Assioma and P1, I faver the Assioma’s rechargable battery, slightly lighter pedals and its more current technology. It just seems like the P1 is due for a P2 at some point. It’s a personal preference so I could see you going either way.
Crank Arm Power Meters
This category has power meters attached to the left (“single”) or both (“dual”) crank arms. Stages, 4iiii and Pioneer have both single and dual crank arm models.
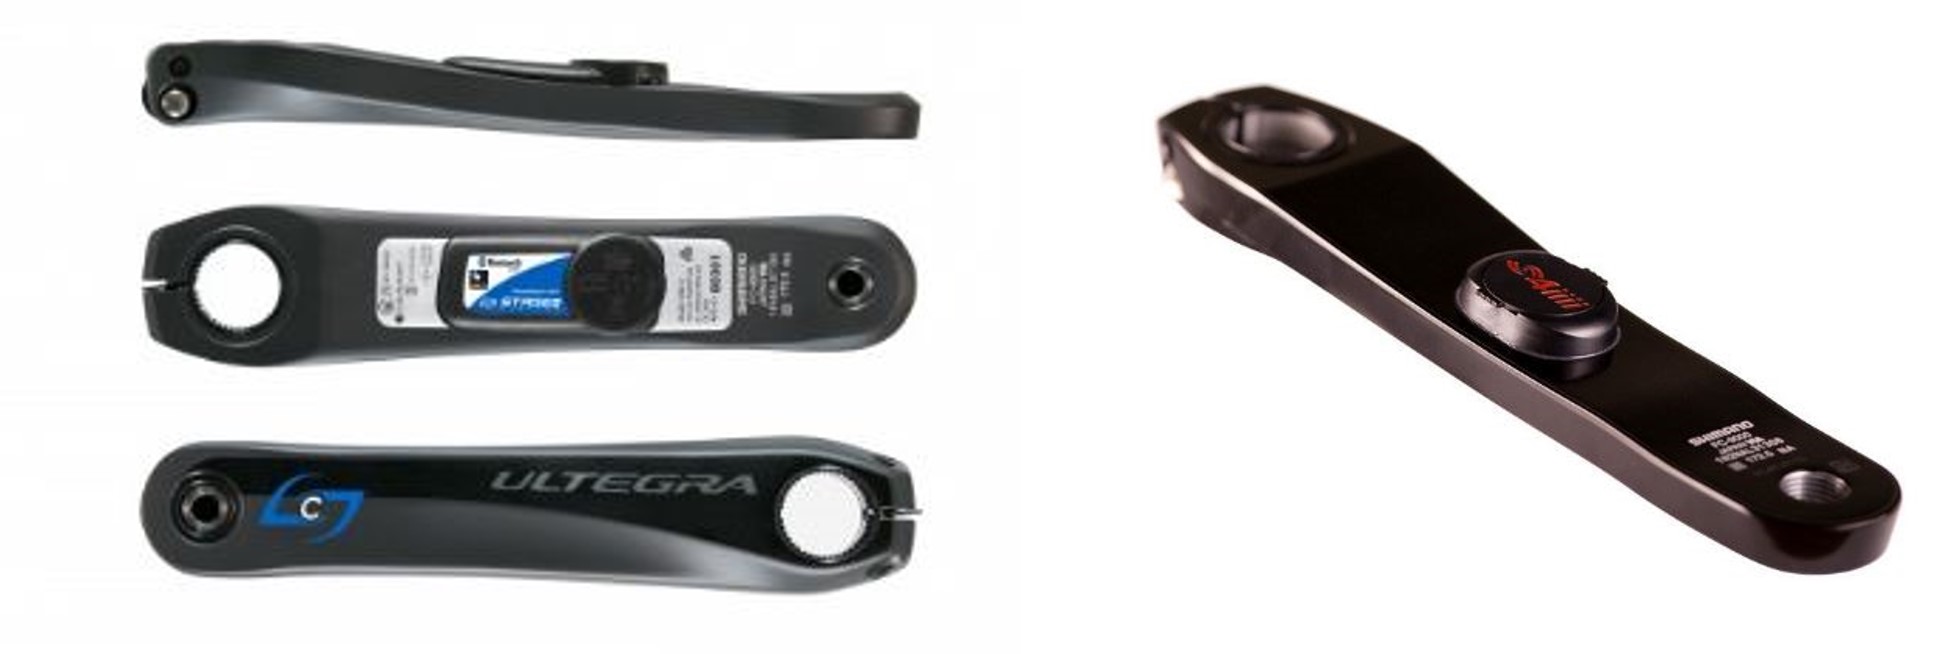
Stages and 4iiii single side crank arm power meters
Unlike those three companies that attach their power meter hardware to certain models of cranks or cranksets they buy from Shimano, SRAM and a few of the others, Verve’s Infocrank has its strain gauges built into both crankarms of a complete crankset built for them by Praxis for compact (50-34) and semi-compact (52-36) combination rings and by TA for standard ones (53-39).
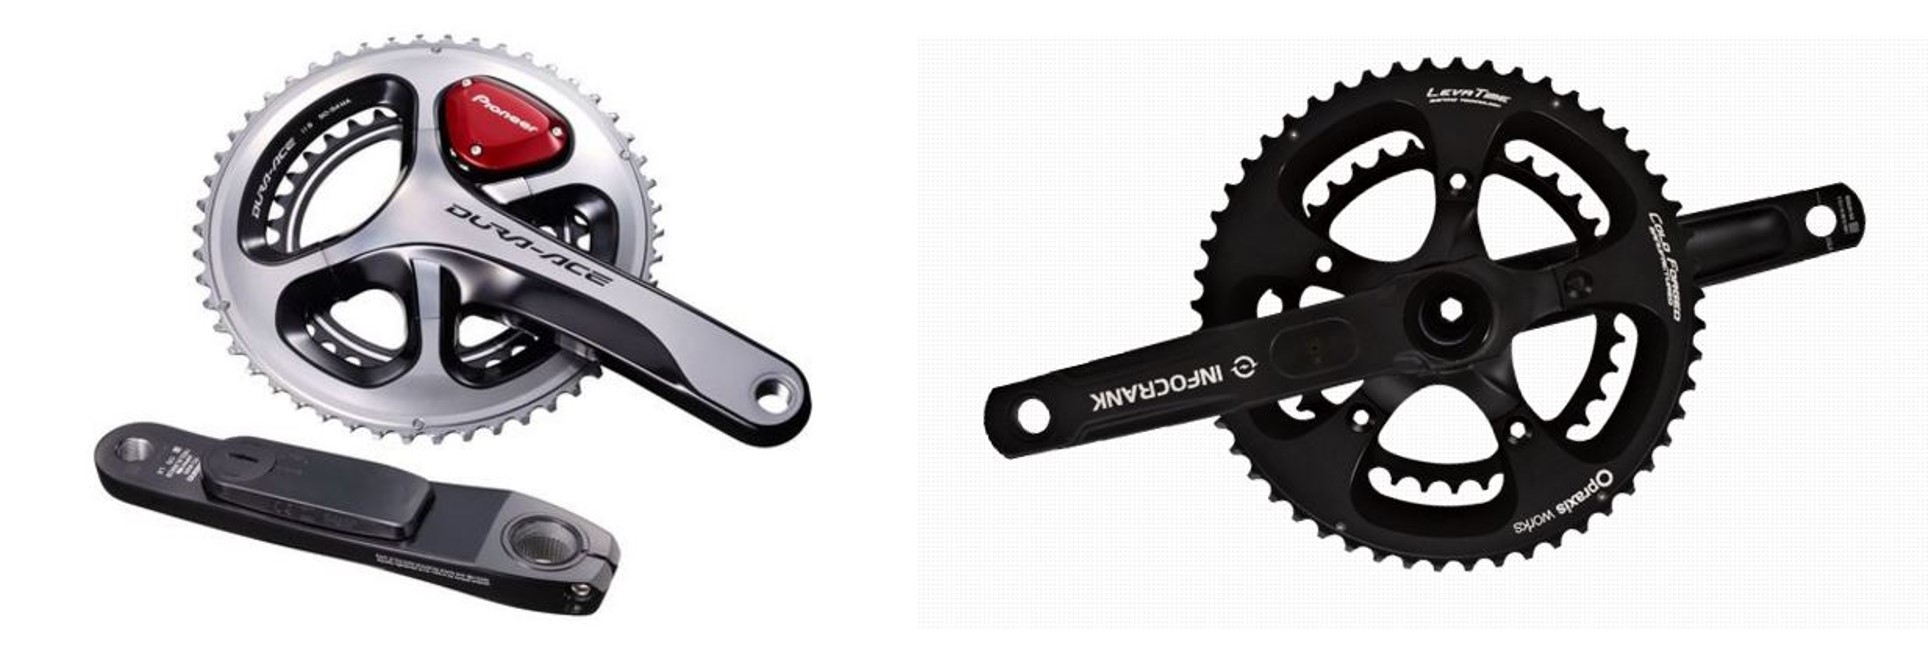
Pioneer and Infocrank dual side crank arm power meters
Watteam sells their PowerBeat sensors that you can glue or have them glue for you to either your left or both left and right crank arms. Those sensors connect to computation/communication units that are placed between your pedals and crank arms and hang below the arms.
Team Zwatt have announced crank arm power meters but is not currently shipping. They have also announced but are not shipping separate power meters that go on the crankset spider and in the axle between the crank arms in addition to those that go on the left crank arm.
Following the lead and hoping to enjoy the same success of Stages Cycling, most of these companies are trying to provide the lowest cost power meters on the market ranging from as little as 260 US dollars or euros (PowerBeat) to about 580 US dollars or euros for the single-sided Ultegra level models.
As I write about later, you can also get power meters built into a heart rate strap for under USD$100 and that hang from your handlebars for under $200.
The drive to the lowest price power meter has performance trade-offs. You have to decide whether the performance level provided is good enough for you.
Nearly all of the companies selling crank arm power meters offer them with sensors on the left side alone or on both the left and right. They’ve proven there is a market for single arm units that offer all the essential power measurement data needed for training. Their research shows most people have little imbalance between the power put out by their left and right legs. The single sided power meters double the left leg power to give you a total power reading.
This approach speaks to our core belief as enthusiasts – works great, costs less – and is probably why Stages has been so instrumental in growing the whole power meter market and causing others to introduce single sided arm and pedal models and everyone else to lower their prices on nearly all models regardless of their location or design.
Yet the cycling industry hype machine (both companies and reviewers) continue to promote independent left and right leg power measurements without being able to articulate the benefits or changes in training we should adopt if we know, for example, that one leg is a percent or three stronger than the other.
There isn’t even a rationale shared by promoters of this measurement approach for having a power balance.
In the era of “big data” that we live in, this is an example of collecting and paying for data we may never find a good use for.
I’ve written earlier in this post and others that probably everyone has some small amount of power imbalance between legs and that it’s likely small, often no more than a couple of percent. Interestingly, this amount is near the measurement error of power meters, for example, 49% power coming from your left leg and 51% from the right on power meters that claim measurement accuracy of +/- 2.0%. Further, few if any coaches believe they know, and I’m not aware of any that have proven the benefit of better balancing your power or that doing so would lead to higher power output.
The Precision and Stages single sided power meters have proven every bit as consistent in a wide variety of situations as the long established SRM, PowerTap hub, and Quarq benchmarks they’ve been tested against by independent reviewers.
For the time being, at USD$500/£470/€525 for Shimano Ultegra model, the single-sided Precision Pro has Stages beat on their respective full retail prices by USD$80/£79/€98. The gap is larger in favor of 4iiii for the Shimano 105 5800 model and smaller for the Dura Ace models.
However, Stages offers a considerably wider range of crank arm models from aluminum to carbon covering Shimano, SRAM, Campagnolo, FSA and Cannondale cranks (full list here). You can also buy an entire new crankset with the power meter installed from Stages generally for less than buying a new crankset from a store and then buying the Stages arm.
4iiii is currently limited to the most popular Shimano crank arms for pre-glued, single side models.
But, if you send 4iiii your own left crank arm, they’ll glue their power meter on it for USD$400/£320/€378/AUD$542 with about a 2-week turnaround time in the US (likely longer when you send from outside the US). And, they can do this with a wider range of models than they just the Shimano cranks. You can see the full list here.
The 4iiii Precision Pro or dual-sided power meter currently only comes in the Dura Ace crankset and is $1500. The Stages dual-arm power meter is also way expensive and not available yet as of this posting. Both companies are clearly focused on the enthusiast that don’t feel the need for a dual-sided power meter.
Stages power meters have automated temperature compensation built into their power meter while 4iiii claims they build theirs to work across a 50C temperature range. Of course, every power meter should be zero offset every day at the beginning of a ride once your bike is outside for 10 minutes.
Pioneer’s crank arm power meters are all about the data and analytics. While they offer separate proven single and dual side measuring power meter models, what they are really selling is the ability to analyze what more than a few testers have called an “overwhelming” amount of data.
And while their prices for the single and dual side power meters are competitive with the Stages single and 4iiii dual meters respectively, you don’t get the benefit of Pioneer’s higher sampling rates and interesting pedal diagrams and metrics without also buying their head unit (ka-ching!). That unit doesn’t do as good a job of GPS navigation as the more commonly used Garmin and Wahoo head units. If you stay with your Garmin, you can’t see even the most basic info that comes with dual measuring meters like pedal smoothness and torque effectiveness, not that you’d know what to do with it anyway.
If someone ever proves the value for the kind of analytics that the Pioneer’s and Garmin’s dueling-different-data-dual power meters can provide, Pioneer might have a fighting chance. For now however, Pioneer is offering something quite interesting but of little proven benefit that requires a bike computer/head unit platform which competes against one (Garmin) that has historically dominated the market. That’s the power meter equivalent of an early breakaway that’s probably not going to stay away all the way to the finish line.
The Verve Infocrank claims the best accuracy of any power meter available (+/-1%), does independent leg power measurement, requires no pre-ride zero offset calibration and has automatic temperature compensation. Those are all “nice-to-haves” but at $1400, £1150 and forced to change out your Shimano, SRAM or Campy crankset for a Praxis or TA that you may feel isn’t of the same caliber, and require installation of new crankset specific bottom brackets in whatever bike(s) you want to use, and is powered by a non-standard battery… well as you can probably tell, it’s not one I am getting excited about.
If you have a couple of bikes that you’ll actively be riding and wanting to transfer your power meter between, there are a couple of things to consider with crank arm power meters. A single arm version is nearly but not quite as simple and quick to change as one of the pedal power meters.
If you have a dual-sided crank arm meter, you’ll need to transfer the crankset (aka chainset) on which the right or drive side crank is attached to along with the left side one. Again, not difficult but a little more time and a little bit dirtier with bottom bracket lube you’ll want to take the opportunity to put in and the chain grease that you’ll want to avoid.
I linked you to a video of how to change the P1 pedals in the section above. Here’s one on how to replace a left crank and an entire crankset for your edification and amusement. As an enthusiast with no shop wrenching experience and indeed never having changed a pedal, crank or crankset myself before getting my first power meters, I can assure you this is all quite doable in short order.
It is also wise, and I’d highly recommend this, to use a small torque wrench when fastening your left crank. This assures you don’t over- or under-tighten your crank and, equally importantly, that it doesn’t move around on you and mess with your calibration. Installed correctly, crank arm power meters don’t take several rides once installed or transferred to read consistently.
Most cranks need less than 15NM (clearly noted on the crank arm) and this uses a much smaller, very portable and inexpensive wrench like this one available from Wiggle.

Of this group of crank arm power meters, the 4iiii Precision is the best value solution and offers similar performance to Stages. As long as they can install the power meter on your crank arm (see the list here) it’s a good choice. If not, the Stages is equally good if a tad more expensive.
The Watteam provides the fascination of L/R data at only the extra cost of your time to install it. It didn’t work for me and can’t recommend it. The Watteam, 4iiii Precision Pro, Pioneer and Verve have much more data and the Verve much more accuracy than we enthusiasts need without offering more valuable or better performance levels despite the last 3 having significantly higher prices.
Spider Power Meters
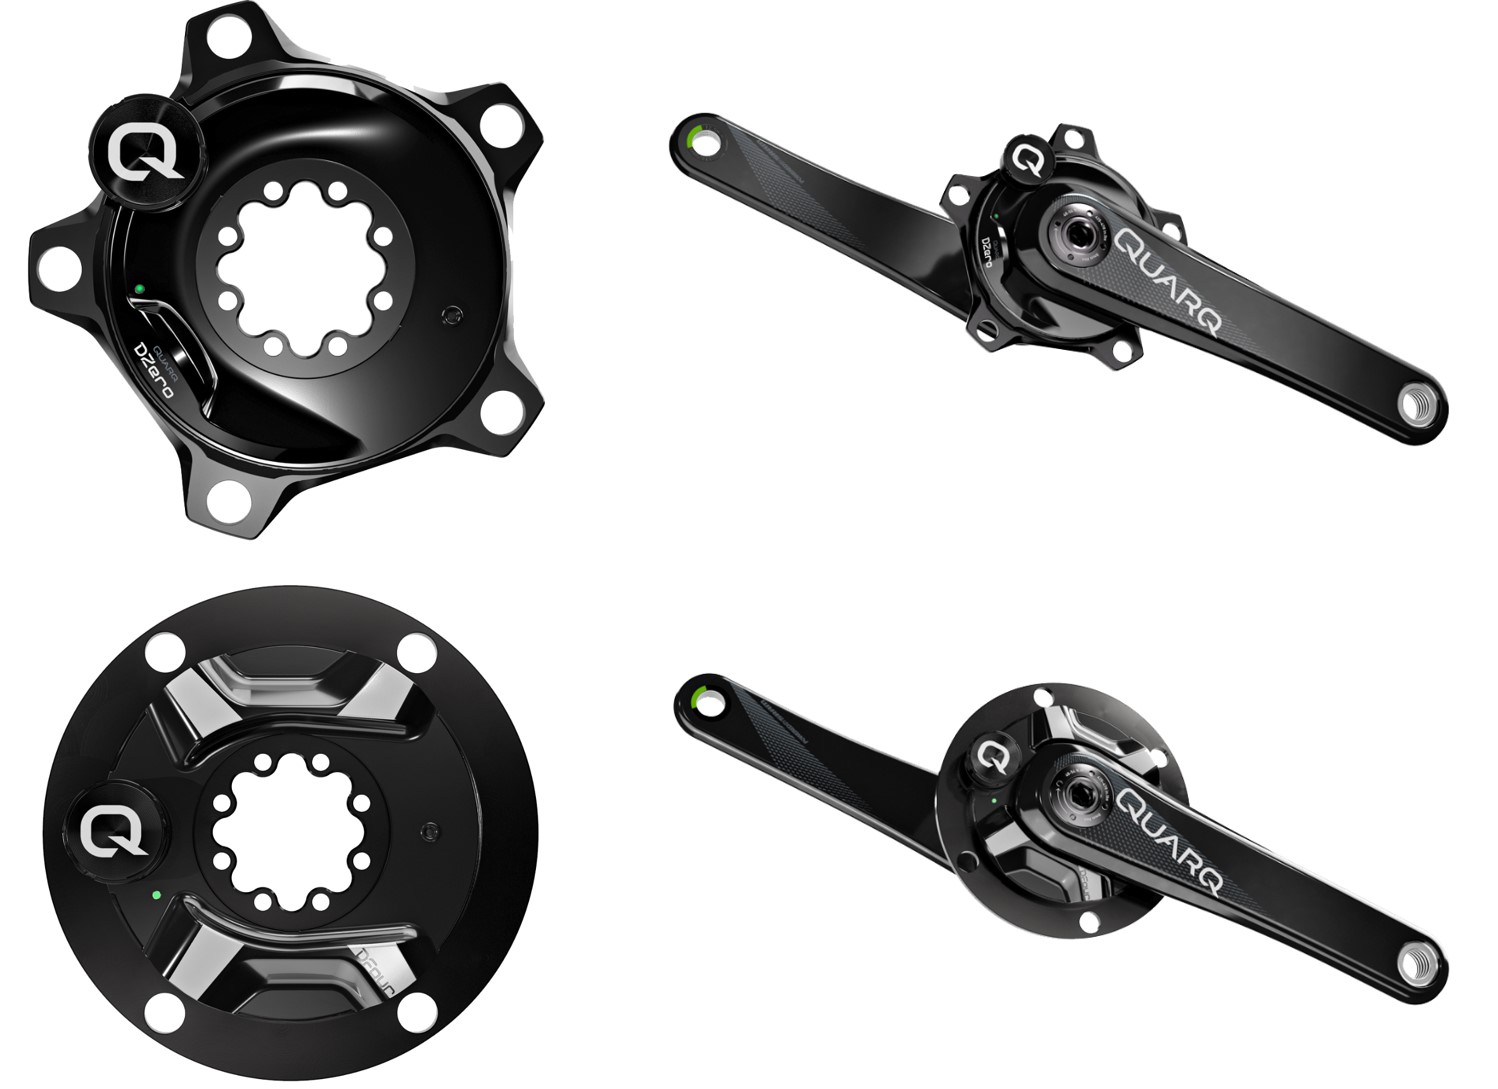
Quarq Power Meter Spiders and Chassis. DZero above; DFour below
Spider power meters, located in the crankset (aka chainset) between the crank arms to the large chainring, are undergoing perhaps the greatest amount of product and price changes just to remain competitive with pedal and cranks arm meters.
Quarq and Power2Max have transitioned to new lines of power meters, introducing them at the 2016 end-of-summer trade shows and making them available in the fall and through the winter. Quarq is no longer making its established and proven Elsa and Riken power meters though they are still available from dealer stock in some places. Power2Max continue to offer the established and proven Type S through their direct online-only channel and, if they follow the same strategy they did when they introduced the Type S, will continue to sell them until all are sold old.
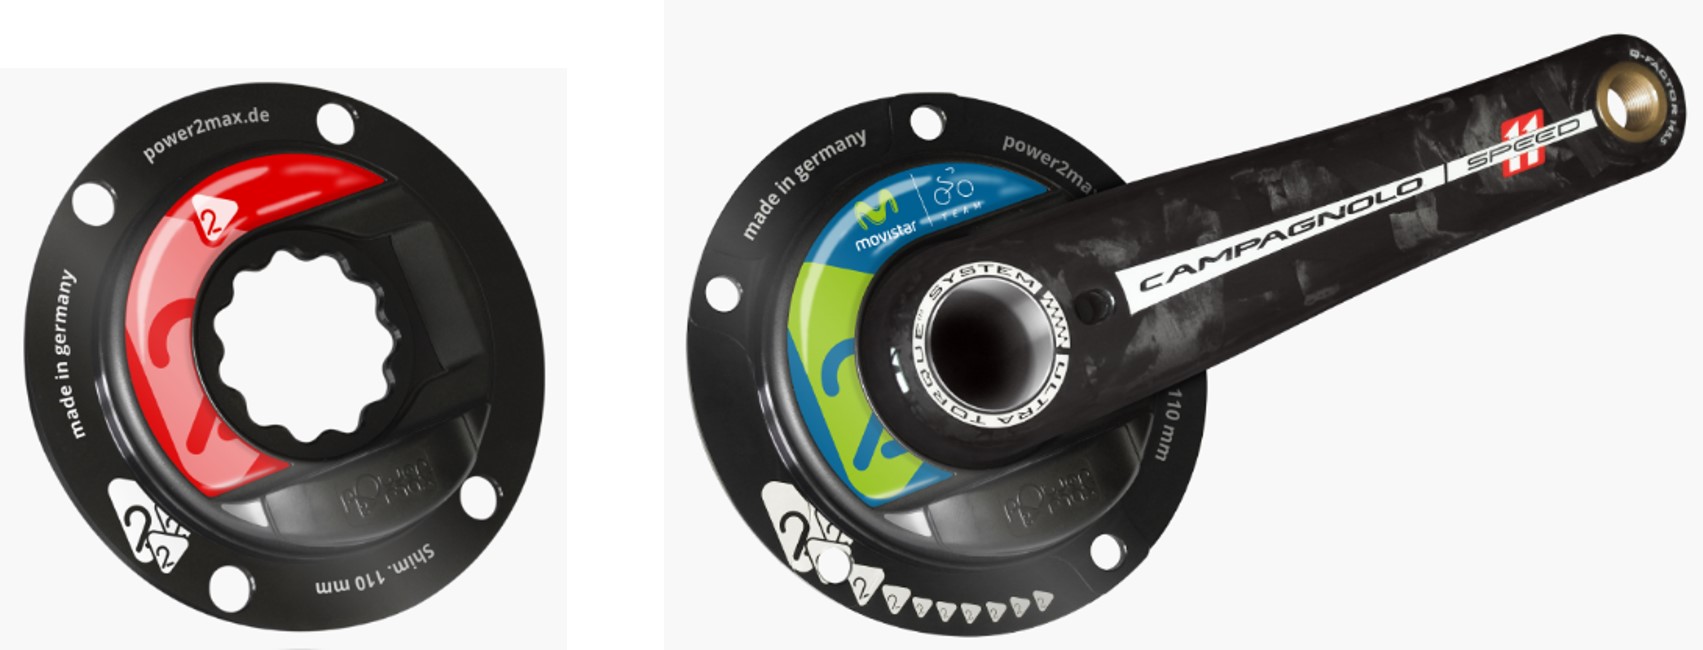
Power2max’s Type S line come with or without cranks with a range of Rotor, S-Works, Cannondale, SRAM, FSA, and Campagnolo but not Shimano cranksets
It has also taken some time for the new Quarq DZero and Power2Max NG power meters to be tested by independent reviewers and customer users, for feedback to come in and any hardware improvements, firmware updates and the like to be incorporated. I and others have found the Quarq DZero to be excellent performers. I’ve not had an opportunity to test the Power2Max NG or NG-ECO and seen only one other review whose tests I trust who has.
PowerTap, already a long time established and proven power meter provider with its units located in the hub, apparently decided to cover its bets by offering pedal and chainring power meters starting in 2015. And Shimano (you’ve heard of them I assume) has yet to begin shipping their very high priced first power meters, also located at the spider.
Unlike some of the new companies announcing or selling power meters located in pedals or cranks, it’s hopefully safe to say that new products from Quarq, Power2Max, PowerTap and Shimano have all figured it out judging from their past success in this product category or, in the case of Shimano, from their success with the electro-mechanical Di2 shifting and most every other category they have historically entered. But, as the former US president who liked to live by “trust and verify” when dealing with nuclear arms agreements, I want to see good independent test results from multiple sources before suggesting you spend your money on a new power meter.
SRM sells its power meter spider built into complete cranksets for most of the top tier groupsets
SRM, historically the gold standard and benchmark reference of power meter performers now require about 2/3rds the gold of just a few years ago to acquire one, as in 2000+ US dollars, pounds or euros. It hasn’t fundamentally or even incrementally changed over the years and now offers no more performance and, in some cases, less capability than others lacking SRM’s brand cache. It’s debatable whether they are the standard for accuracy or consistency anymore and they certainly lack some of the capabilities elite athletes and their coaches are looking for these days.
FSA has a power meter called the PowerBox supplied by Power2Max with their Type S integrated into their new chainsets. And Team Zwatt has also announced its intention to sell a power meter with a chainset spider location. No sign of it yet in the market.
So, again, lots going on here. Currently, however, only the SRM, PowerTap C1, the four Quarqs (the latest generation DZero and DFour and the phasing out Elsa and Riken models), and Power2Max Type S and FSA PowerBox are established and proven with the Power2Max line switching over to NG units that aren’t yet proven. I’ll update this post as those and hopefully, other spider-located power meters go into production and their level of performance is proven.
Let’s see if we can come up with a winner for enthusiasts at the spider location from these and their Power2Max successor, likely to prove out well.
First, cost. As mentioned above, the SRM is expensive and 2 to 3x the price of the other proven meters. SRM’s cost has always been a reason for enthusiasts to not even think about buying one and continues to be. Out.
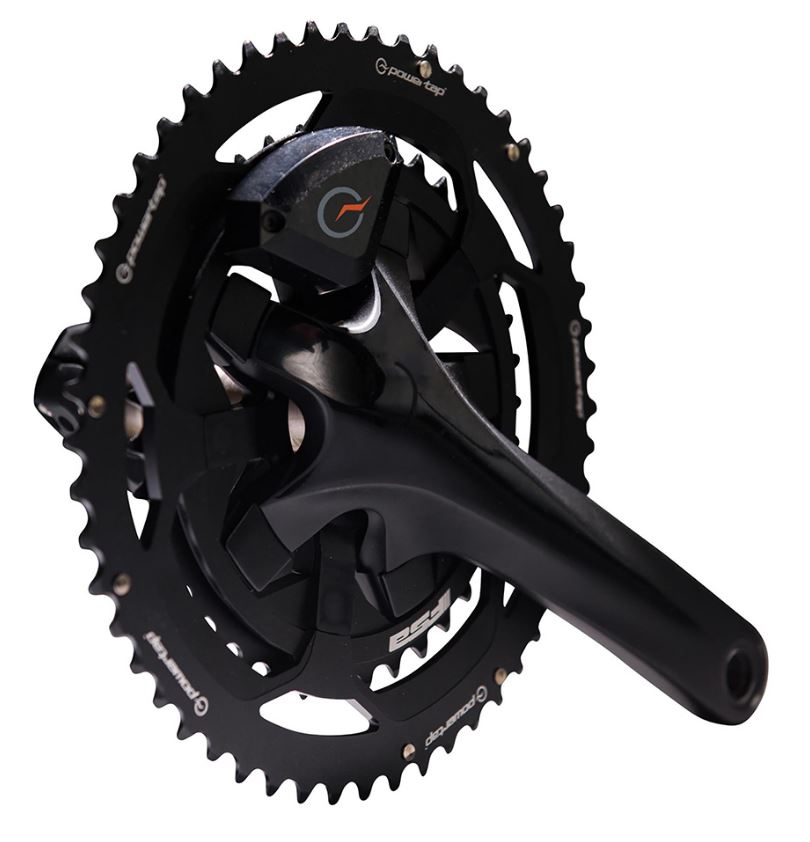
The PowerTap C1 power meter attaches to included chainrings but that isn’t compatible with most current crankset lines
While we’re doing quick eliminations, I want to take a pause from comparing costs to rule out another contender. The PowerTap C1, which actually comes attached to the big ring in a two-ring crankset that is part of what you get when you buy the power meter, attaches only to 5-bolt cranksets.
Translation? They don’t work with today’s modern Shimano and SRAM cranksets which both have 4 bolt holes to attach the rings to the crankset spider. So the C1 doesn’t work with Shimano Dura Ace 9100 and 9000, Ultegra 8000 and 6800 and their Di2 brethren, the 105 5800, SRAM Red 22, Force 22, Rival 22, Cannondale Hollowgram, Specialized S-Works, anything from Campy, and a bunch of modern FSA groupsets. Here’s the complete list of what the C1 is compatible and incompatible with. Oh, and the C1 doesn’t work with true 50/34 5-bolt compact sets either because of where the power reading pod sits on the ring. You can do a 50/36 however.
If you have older sets, and we’re talking about sets that were sold before 2014 or 2013 in some cases, you may be in luck. There are likely still older, 5-bolt sets on the road today than there are newer, 4-bolt ones. But then, my guess is that if you have one of those older sets, many of which are for 10-speed gruppos, you probably aren’t in the market for a power meter. Even Stages, which opened the door for enthusiasts to afford cranksets, no longer makes crank arms for 10-speed cranksets.
Therefore, I’m going to rule out the PowerTap C1 as largely incompatible with the cranksets most enthusiasts who would want a power meter will have on their bikes. PowerTap may have been trying out the crankset segment of the market and, if successful, come back with a C1’ or C2 that is compatible with current generation groupsets. Or, they may have gone after a solution that could serve the bigger installed base of cyclists with 5-bolt cranksets thinking that those riders on older cranksets would be as open to training with power as would enthusiasts with newer, 4-bolt cranks at their feet.
I may be wrong on these alternative rationales for their decision to go after 5-bolt enthusiasts and by excluding them from further consideration against others in the category. I’m just trying to come up with an explanation for why they did something that seems unlikely to succeed. Time will tell.
This leaves us with the Quarq and Power2Max power meters which have both going through the product line changes I mentioned early.
There’s not a lot of performance, design or cost difference between the Quarq and Power2Max power meters. They both fall in the 600-800 US$/£/€ range for alloy power meter spiders sold without rings. I’m not going to get all granular about pricing here since there’s a myriad of more expensive options both companies offer that include crank arms. I provide you links to the best stores with the best pricing at the end of this review (or you can go there now).
Quarq, like Zipp and other divisions of the SRAM family, has distribution rules that limit where their dealers or stores can sell to customers based on the region of the world that the store operates. You aren’t supposed to be able to buy a Quarq (or Zipp wheelset or SRAM components) from a UK based store if you live in the US, for example, though some stores will sell you one. But I’m getting ahead of myself.
Both the Quarq and Power2max meters measure your total power rather than one side or each side independently as with the pedal and dual crank-based power meters. Instead, Quarq and P2M use different algorithms to estimate your left and right leg power, with some reviewers saying they mirror true independent leg measuring power meters in side by side tests while others say they don’t. Go figure!
Again, I don’t think this left/right measuring is useful to enthusiasts unless you buy into industry hype, you are interested in torturing yourself with data you really can’t change much or perhaps shouldn’t try to, or you are soon to become an elite athlete. I’m all for those of you in the third category!
All the spider power meters save for the PowerTap C1 basically install by bolting in next to your crankset rings and transfer between bikes essentially the same way. They are more time consuming to install than the single-sided crank arm power meters but transfer between bikes the same way as a dual-sided crank one does. See the video in that section above to see how.
If you want to use different size rings on the crankset for a specific event where a different ratio would be better suited, you can certainly do that much the same way you would normally change rings. If you move the entire crankset with the power meter already installed to another bike, you’ll need to have the same model bottom bracket installed on any bike where you want to use that crankset. All of this may drive some of you to your bike shop with your bike(s) for some help in getting everything set up.
The outgoing Quarq Riken and Elsa models have different numbers of bolt holes, bolt circle diameters (to more easily accommodate compact cranksets) and bottom bracket compatibility. Most come with arms (either alloy or carbon) and some are available with just the spider itself. It was Quarq’s attempt to provide a wide range of compatibility options in the muddle of today’s cranksets, bottom brackets, and competitive offerings.
The new Quarq DZero and DFour power meters simplify what was different numbers of bolt holes, bolt circle diameters and bottom bracket compatibility that was the case with the earlier models. They add a few improved capabilities (geek-out level stuff), a wider range of compatibility and are priced the same as the outgoing Quarq Riken and Elsa (though the those are discounted now).
The DZero spider alone sells for a list price of USD$679/£583/€689. That’s between the price of the single-sided Favero Assioma pedal ($519) and dual sided ones ($799) and more than the single-sided 4iiii ($500) and Stages ($559) single-sided crank arm power meters.
A Quarq DZero set with alloy arms will run USD$779/£693/€818 and with carbon arms USD$1079/£858/€1013 (no rings on either). The DFour versions of these are priced about 100 more for each model at each currency.
Power2Max’s new NG line prices are about 150 more expensive than the new Quarq DZero coming in at US$940/€990 for the spiders alone. Depending on the type of crank arms you want, the P2M NG are priced anywhere from on par to a couple hundred more than the DZero models.
The FSA PowerBox power meter, essentially the Power2Max Type S with FSA alloy crank arms goes for $650. That’s anywhere from 0 to about $100 more than buying the Power2Max Type S spider itself and using your own crank arms.
Independent testers including my own experience have shown the new Quarq DZero to perform well. The jury is still out on the P2M NG. While I expect it to also perform well based on the company’s track record, the NG will start at a price disadvantage.
Power2Max has added capabilities to the new NG – claims of +/-1% accuracy, rechargeable USB connected batteries, Bluetooth, added pedaling metrics – but these “next generation” power meters are not compatible with Shimano cranksets the same way the Type S line wasn’t. You can replace your Dura Ace or Ultegra cranksets with complete ones from FSA, Rotor, SRAM, and others, but that adds to the cost of using a Power2Max crankset even if you can resell your Shimano set.
Many may also find mixing the brands or using a crankset that may not perform at the same level as their Shimano, SRAM or Campy ones to be less desirable. And since most enthusiasts, and most cyclists for that matter, use Shimano, as a practical matter this makes the Power2Max attractive to a smaller audience.
In my experience, the new Quarq “just works” consistently and in all situations. It’s easy to zero-offset initially or along the way (just rotate the cranks 5 or 6 circles counterclockwise) or you can use your head unit to zero-offset the unit. While they automatically compensate for temperature changes, as with any power meter, you want to run your first zero-offset after they have been at the temperature you are going to begin riding at for 5-10 minutes.
In addition to the good and consistent results I and others have had with the Quarq, I’ve also seen that the computed L/R balance is right on or within a percent or two of what I’ve seen on independent L/R power meters that I’ve run at the same time.
For cost and compatibility reasons, seeing little difference in performance and their ability to meet the four essential requirements, I’m recommending the Quarq DZero and DFour as the best option among the spider category of power meters.
Power Meters in Other Locations
Beyond the pedal, crank arm and crank spider, there are several other less common locations to place power meters today. These include those located as part of the rear wheel hub, the axle running between the left and right crank arms, inside the shoes or in the cleats that attach to the shoes, or on the handlebars.
Hubs
PowerTap was one of the first to offer an alternative to SRM’s original crank spider unit, developing and successfully selling a power meter as part of a rear hub. This was and remains a low cost and popular alternative especially for those who plan to use one wheelset or have wheelsets built to their own specification.
When the first PowerTap hubs came to market, buying custom built wheels was a common if waning practice. Now it appears even less common, especially as most of the best performing carbon rims you find in wheelsets designed and built to a standard by companies are not typically available to the many small shops that build custom wheels.
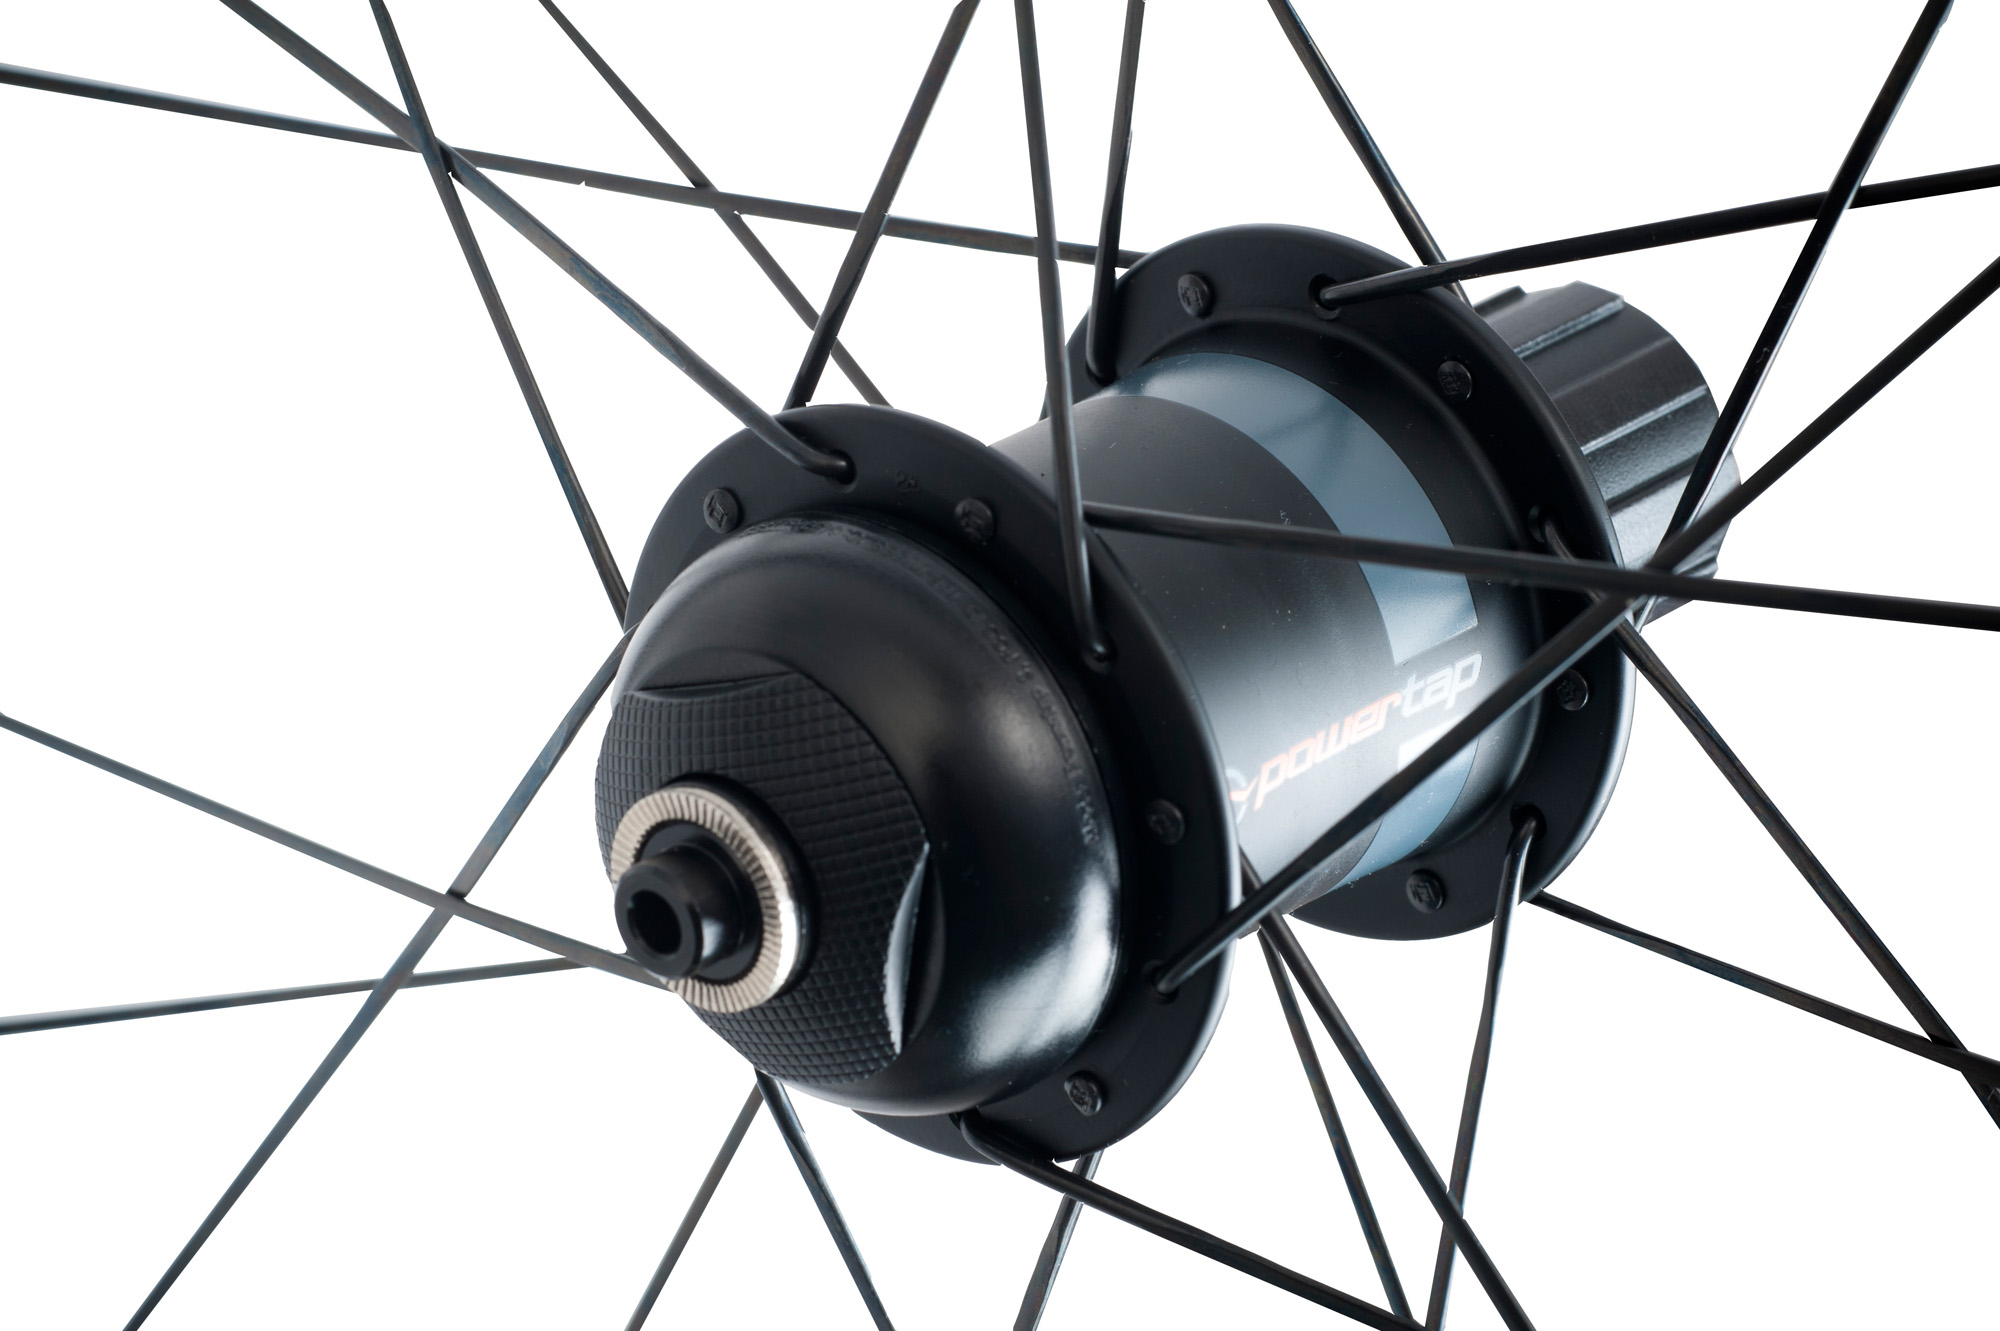
PowerTap G3 hub power meter
For several years, PowerTap have had agreements with Zipp, ENVE and HED to have some large custom wheel makers build selected models of their wheels with PowerTap hubs. This usually adds only a couple hundred $/£/€ premium to the price of the wheels compared to buying the complete branded wheelset with the standard hub.
PowerTap rim brake and disc brake wheel hubs continue to be a good option for enthusiasts if you want to train with power and plan to use only one set of wheels, especially if you want a Zipp, ENVE or HED, or if you want that one wheelset to be a custom built one.
If, as with some enthusiasts, you plan to use different wheels and want to train with power all the time, a power meter in the hub doesn’t work as it is not transferrable between wheels. You could always buy you extra wheelsets with PowerTap hubs, but that isn’t a transferable solution.
While most enthusiasts primarily use the one set of wheels, many have a second pair they might use in the winter or for specific climbing or speed events or a set they’ve upgraded from but still might want to have available to use from time to time. Others don’t want to be limited to the Zipp, ENVE or HED available models or prefer wheels whose rims aren’t available to custom wheel makers or want standard-built wheels supported by larger companies.
If you have multiple bikes but plan to use the same wheelset on them, there really is no simpler and quicker transfer solution. You just move the wheels and the power meter comes with it. I think it’s more likely, given the cost of bikes these days and the increased versatility that a good one offers, that you will have a second set of wheels than you will a second bike with just one set of wheels you use between them.
Your second bike may also be for such a different purpose (cyclocross, gravel, aero, disc brake, winter riding) that you would also use a second set of wheels consistent with that purpose. But unlike some of the pedal and arm power meters that can quickly and easily transfer between bikes and for which changing wheels doesn’t affect them, a power meter that’s part of a single wheel seems to provide you far fewer options to keep training with power in different set ups you might use as an enthusiast.
You can move your PowerTap hub from the wheelset you own to the one you are upgrading to if, as with your first set, you choose an upgrade wheelset that a custom-wheelbuilder can build your hub around. This is more like “move-ability” in the way you might move your box spring and mattress from your current apartment to your next one. Transferability on the other hand, to continue with this perhaps uncomfortably close-to-home metaphor, might be more like bringing an air mattress with you as you crash at one friend’s place after another while you are between apartments.
There remain several companies that make alloy rims, some that are quite modern in width and profile and are commonly used by wheel builders. Separately sold carbon rims are less common from the branded wheelset makers but are plentiful from less know Chinese manufacturers. Spokes, fortunately, are not an issue. Most are made by a small number of companies and are sold to both custom and standard-built wheelmakers alike.
Some have also found the custom-built wheels with Zipp and ENVE rims built around PowerTap hubs to be less stiff than those built by Zipp and ENVE with their own or subcontracted hubs (like the DT Swiss 240). As stiffness is a key to effectively transferring power and responding well during climbing, sprinting, accelerating and handling, this is a knock against the PowerTap hub as a hub rather than as a power meter, especially for heavier riders.
The design and performance of the best hubs used by enthusiasts are advancing thanks to wider flange spacing, taller flanges, and hub engagement mechanisms that create less freewheeling resistance. I don’t know that the PowerTap hubs are keeping up with these developments.
Because of the PowerTap hub’s lack of transferability for people who use more than one set of wheels, its limited wheel choice and hub stiffness considerations, there are probably a limited number of enthusiasts this power meter will work for and that group is likely getting smaller. But, if you are one without those concerns, this hub will be a low cost, strong performing option. For these reasons and despite its limitations, let’s keep this hub power meter in the competition.
While I can only guess, it looks like PowerTap realized the customer base for their power meter hub is also getting smaller. They have introduced pedal and crankset power meters that will reach customers for whom the hub can’t – those that use more than one wheelset or those that prefer the growing number and range of standard-build wheelsets. You’ll also notice that of all the other companies in the power meter market, none have developed one for the hub.
Axles
At last count, there were four companies making or planning to make power meters in the axle that runs between your crank arms. Depending on when you read this, there are probably more. Rotor sells the proven INPower single side measuring power meter and they more recently began selling the as yet unproven 2INPower which, as the name suggests, measures each side.
Ashton and Dyno Velo have announced but are not yet producing power meters they also plan to locate in the axle. And, Team Zwatt pops up in this spot with its third concept power meter. Indeed, all three of these are not more than concepts now and aren’t worth further comment.
Let’s look at the Rotor INPower a bit more. It’s accurate, consistent, has good battery life (200hrs, AA battery) and transfers the same as any other power meter where you are switching over the entire crankset from one bike to other. The INPower is compatible with bikes that use a Universal Bottom Bracket (UBB), which most do.

Rotor sells the single-sided measuring INPower in various forms depending on what Rotor crankset components you already have
It also puts the extra weight of the power meter in the center of the bike (axle) rather than on one side like the spider, single side or single side crank arm units do. Crank arm power meters from Stages and 4iiii add 20 grams or less to the left side so it makes no difference. Single side pedals add 20 grams (bePRO S) to 80 grams (PowerTap P1S). Spider power meters are the heaviest of the three types but that weight is closer to the center of the bike. I don’t really know how big a deal this is to have slightly more weight on one side or the other. I’ve never talked to a bike fitter about this or seen a tester or user mention it. If you have some expertise on this, please share it in the comment section below.
On the downside is the INPower’s cost which starts at $779/£499/€649 for the lowest priced of their three models. This is more than the other single-sided power meter options. You also need to have or be willing to switch to Rotor cranks and chainset. If you are a fan of Rotor’s oval or “Q-Rings”, this is one of the only power meters that measures them well (PowerTap pedals do also). Sometimes I think this is really about Rotor trying to get more revenue from its captive chainset market or perhaps expand it somewhat rather than the company making a play to enter the rapidly growing market of power meters for enthusiasts.
The dual-sided Rotor 2INPower isn’t proven yet. And it’s no cinch that because the IN proved out accurate and consistent that the 2IN will as well. Further, if you want to get more power data at a later time, it’s not a matter of simply upgrading from the IN single to the 2IN dual-sided unit either. You need an axle power meter that tests the twisting coming from both sides for the 2IN so it’s a totally different unit. The 2IN is only sold as a complete unit – both arms, spider and axle – so if you bought it, you wouldn’t use any of the IN you previously purchased. The 2IN is also more expensive than most other dual-sided, independent leg systems. So the 2IN looks like it might be out even before it’s in.
Shoes and Cleats
Power meters placed in your cycling shoes or cleats would be closest to the source of your leg power and the ultimate in transferability. Unfortunately, they are not ready for prime time yet.
RP2M has introduced one for cyclists that is part of your insole. It was originally developed for runners but it hasn’t been tested by any independent cycling reviewer I’m aware of. It’s available (barely) but not yet proven.
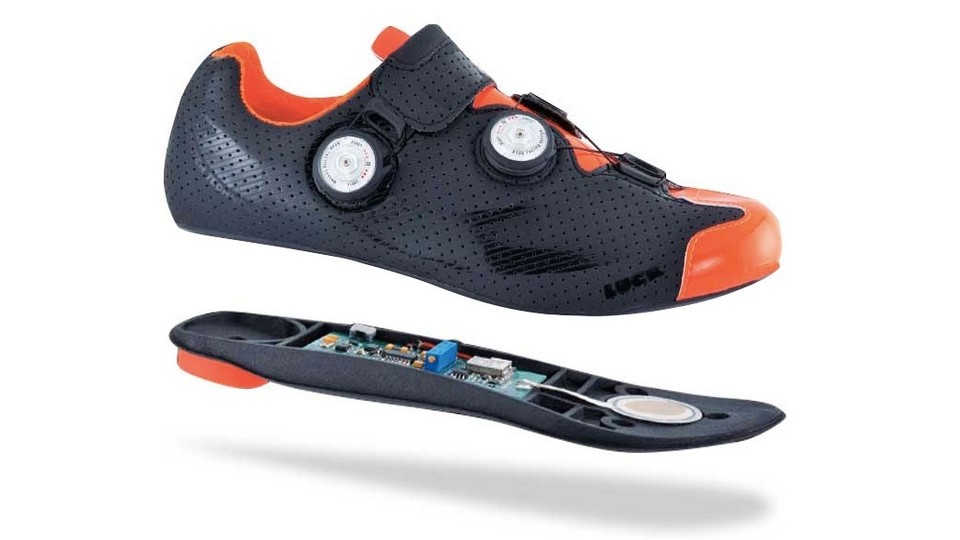
Luck Shoe power meter concept. Maxwell Smart would have loved this!
The Luck cycling shoe company has been talking about a power that would also go in the outsole of their shoes for a couple years now but it hasn’t been made available yet. Cool idea but, of course, you’d have to like the shoes as well.
Brim Brothers stopped chasing their dream in the Fall of 2016 after working many years from initial concept to taking orders for a power meter built into Speedplay cleats attached to the bottom of your shoe. After claiming to prove out their design through several rounds of prototypes, they raised money through Kickstarter for their first production run but couldn’t get many working units coming off the line. The money ran out with no fix to the problems or investors in sight.
This is perhaps just the latest story of a power meter concept that creates good press (and raises a fair bit of money) but never makes it to the market. Shame. Would have been great.
Bars
While all the power meters I’ve reviewed up to now measure the force your legs apply through one or multiple strain gauges in components that are linked to them, there are three power meters have no direct interaction at all with those same legs.
The Velocomp PowerPod calculates power after measuring your acceleration, wind resistance, elevation speed and a few other environmental factors. It’s light (65 grams all in), a little larger than the size of a deck of playing cards, and hangs down from your handlebars using a GoPro style connector. It is therefore simple to transfer; put it in the same place and at the same angle on each bike you use. It connects to your bike computer via ANT+, lasts about 20 hours and recharges with USB connector.

The PowerPod mounts under your handlebars
It doesn’t have speed or cadence sensors built into it but, to calculate power, it needs to read that data from any ANT+ ones you have mounted on your bike.
Oh, and it only costs $299. Yeah.
Sounds appealing, right. How does it perform?
If you do the initial calibration ride right, then it is in the range of accuracy and consistency of any other any +/-2% or better unit if you stay on the road and don’t change your position on the bike much during a ride. You only need to do the calibration ride once when you first install or transfer it to any bike (or if you change your head unit) and it takes maybe five minutes of clear road to do it. Also, if you take it off your bike to charge it, you’ll get inaccurate data the first few minutes of a new ride so it’s best to charge it on the bike.
It can get a little erratic if you are riding on very bumpy on-road situations (like cobbles) or off-road ones. Remember, this review is for road cycling enthusiasts.
Using the PowerPod does become problematic if you change your position on the bike a lot. The PowerPod assumes an unchanging drag coefficient for each rider based on your height, weight, and your position on the bike when you do your initial calibration ride. The effect of this is that your power readings will increase by about 6% above what you would read with a direct force power meter whenever you get into an aero position.
If you don’t change your position much this won’t be an issue. However, if you go in and out of aero positions or sit up from time to time or get out of the saddle when you climb, you will get a distorted picture of your power output. If you had a PowerPod and a direct force power meter each with their own head unit on your bike, you could calculate the benefit of getting into different positions but I’ll save you a lot of time and money simply by saying your power will reading will increase (and your drag will be reduced) about 5-10% when you get aero.
[If you’re really interested in the effect of aero position on your speed and want to reduce your drag by as much as 11% to 14% in positions that every enthusiast can adopt during a ride, I wrote a whole section describing the quantitative benefits of different aero positions in my post How To Ride Faster On Your Bike: 10 Better Ways – Training and Technique.]
For me, a 5% or greater level of power meter reading variation depending on my position on the bike is a disqualifying factor, especially when you can get true readings from a power meter that costs just a $100 to $200 more. Further, you’ll never get consistent readings from ride to ride as your positions will likely vary throughout the same course and certainly as you ride different courses.
The Powerpod is the equivalent of activity trackers like the Fitbit or Vivosmart. Novel but not accurate and certainly not producing data you should base your training on. So these are out.
Strap
Lastly, there’s the Powercal, a heart rate strap that estimates your power output by comparing changes in your heart rate to a library of data files that measured power output during similar heart rate changes in others. Unfortunately, when tested side by side with established and proven power meters, the Powercal readings show wide fluctuations. It’s not anything like dependably consistent, my first requirement for considering a power meter for road cycling enthusiasts. So, I must rule it, and its attractive $99 price, out.
That means the Powertap hub and Rotor INPower are the only two in the Other Location group I think you should consider. They each have limitations and would serve different, narrow enthusiast customer bases. I don’t know that there is any value in choosing a winner between them and will move them both forward to the final round.
In The Know Cycling supports you by doing hours of independent and comparative evaluations to find and recommend the best road cycling gear and kit to improve your riding experience.
You can support the site and save yourself time and money when you buy through the links in the posts and at Know’s Shop to stores I rank among the best for their low prices and high customer satisfaction, some which pay a commission that helps cover our review and site costs.
Click here to read about who we are, what we do, and why.
RECOMMENDATIONS
If you’ve read everything up to this point, God bless you. If you came straight to this section, I’ll tell you that six power meters made it through the elimination rounds when compared to over 40 distinct power meter products. You can scroll back to read the details of those contests or continue forward to see my recap.
The Favero Assioma bested the Garmin Vector 3 and Powertap P1 on a combination of price and personal preference for a rechargeable battery and a lighter pedal with little difference in the performance (consistency and accuracy) and quality between these. These are compatible with most any bike and are a great solution if you value transferability and are ok using the Look Keo pedal platform.
The 4iiii Precision won over the Stages and other crank arms on price amidst similar performance. The Precision doesn’t offer many options outside the world of Shimano cranksets most of us enthusiasts live in. Stages, which costs about 10% more, covers a wider range of crankset brands and also makes them for carbon arms. They become the winner if 4iiii doesn’t have a solution for you.
Quarq’s DZero and DFour are far lower priced than the as yet unproven but likely to prove out Power2Max NG. Only the DFour is Shimano compatible though. There are other spider options that have inferior cranksets (FSA PowerBox) or limited compatibility (PowerTap C1).
In the ‘other locations’ elimination round among power meters placed in the crankset axle, rear wheel hub, shoes, handlebar mount, and even heart rate strap, PowerTap and Rotor INPower survived my four essential requirements for enthusiast power meters though each serves a limited customer base. The others in this group are either unproven or inaccurate and inconsistent.
With all these new units coming, here’s a question you might ask yourself: Should you buy one of the power meters I’m going to recommend below or wait for some of the new ones to see how they compare?
I’ll answer the question this way. If you want to train with power, you can get in now and get all the performance an enthusiast will ever need at a very good price (from USD$400-$800). The power meters I recommend below have proven dependably accurate and consistent, compatible to a broad range of enthusiast gear in different combinations, relatively easy to install and transfer on your own and provide and communicate all the essential data needed for a comprehensive training program that will meet your goals.
Most of the units that I expect will be proven out in the next 12 months will offer capabilities like independent leg measurement or pedaling mechanics that only some elite athletes and their coaches think they need. Power meters with these capabilities haven’t been shown to be any more consistent than those that double the power measured from a single leg or that measure your total power. Further, no ongoing training benefit has been shown by using independent or dual leg power measurements or from charting pedaling mechanics for enthusiast-level cyclists like you and me.
There are several announced but not currently available or unproven power meters that are or likely will be priced below the least expensive proven ones you can buy today. Perhaps they will make it to the market and prove to be reliable performers and perhaps they won’t. There are unfortunately many more recent examples of the latter than the former.
If you really want to train with power, I think it’s hard to argue with the prices of proven power meters out there today however, especially considering how much they’ve fallen in the last couple years and how they compare with other things we enthusiasts buy that produce less training or performance benefit and cost more money.
Among the power meters I ticked through above that won or finished a close second in the elimination rounds, I recommend the following:
Best Performer – Quarq DZero and DFour
No less accurate or consistent than far more expensive units like “the gold standard” SRM, Quarq power meters have established themselves as dependable top performers over many years against many competitors. The new DZero and DFour (for Shimano cranksets) perform likewise in my tests and those of other independent reviewers I trust. Between the DZero and DFour models that use the same measuring device and come on a spider alone or with alloy or carbon crankarms, you can find one that is compatible with most modern cranksets and bottom brackets, i.e., yours.
For traditionalists, they measure your total power and for new schoolers, they calculate, if not independently measure, your left and right power. To be clear, I don’t recommend them just because they have that capability but instead for their long-term dependability and broad compatibility at a decent price.
They take a bit more work than pedal and crank arm power meters to install and transfer but it’s certainly doable for most the humble home wrenches among us. They are a few hundred more $, £, € than the Stages or 4iiii but a lot less than SRM, Power2Max, Verve, and others and are priced about the same or less than the pedal power meters.
The DZero spider sells for a list price USD$679/£583/€689. The set with alloy arms will run USD$779/£693/€818 and with carbon arms USD$1079/£858/€1013. The DFour versions of these are priced about 100 more for each model at each currency.
You can find the Quarq DZero at stores with some of the best customer satisfaction ratings and lowest prices for this power meter by clicking on these links to Competitive Cyclist (spider), Competitive Cyclist (crankset), UK/EU Merlin, Chain Reaction Cycles, Wiggle, Tredz 10% off w/code ITKTDZ10.
The same goes for the DFour by clicking on these links to Competitive Cyclist UK/EU Merlin, Wiggle, Tredz 10% off w/code ITKTDZ10. Quarq dealers are not allowed to sell outside defined geographical regions so if I haven’t listed one in the region where you live, you may want to check with your local bike shop.
Quarq, like Zipp and other divisions of the SRAM family, has distribution rules that limit where their dealers or stores are supposed to sell to customers based on the region of the world that the store operates. That’s why I’ve listed stores in different regions. Try them all; sometimes exceptions are made.
Best Value – 4iiii Precision
At USD$500/£429/€515 for the Shimano Ultegra R8000 model, the single-sided Precision provides all the performance you need at the best value out there.
4iiii has dropped prices on the remaining dealer inventory on the Ultegra 6800 model to $375 and the Dura-Ace 9000 model to $450.
If you are willing to part with your crank for a couple of weeks and you have a crank arm they have experience with, you can have 4iiii install the Precision on it for even less – USD$400/£320/€378/AUD$542.
Being a crank arm power meter, the Precision is easier to install and transfer than the Quarq – just a couple minutes – is feather-light and will last several months on a charge. Independent tests have shown it performs with the accuracy and consistency of the Three Wise Men of the power meter world – SRM, PowerTap (hub) and Quarq.
The Precision is compatible with current generation Shimano cranks and can be installed on a few from other brands. The Stages power meter is equally good, and only a tad more expensive. It works on more crank arm models than 4iiii including carbon as well as alloy ones from Shimano and other brands.
The 4iiii Precision is available at the best prices from stores customers give very high customer satisfaction ratings to including Power Meter City 10% off w/code ITK10, Merlin, Wiggle
Best Expandable – Favero Assioma
This is a recommendation for those who want to start training with a power meter that provides everything an enthusiast needs but may want to move down a path to get all the data and analytics one could ever hope for (but not really need) without wasting the money you first spent. (We enthusiasts have standards!)
Despite my self- or, more likely, spouse-imposed budgetary constraints, I am occasionally that guy who wants the cool gear I don’t really need. We know who we are: notoriously geeky, insatiably analytical, willing to spend money on most anything that looks cool. Well, at least two out of three in my case. If you are an enthusiast that’s three for three, I want to offer you an option to take it to the limit, one more time, with a Best Expandable power meter.
The Favero Assioma performs consistently and accurately, as good as the Stages in single pedal or Uno mode and the Quarq DZero in Duo mode based on my tests and others against these two well-established power meters. You can buy the single-sided Uno for the price of a single crank arm pedal power meter and call it a day. It comes with a right pedal that has now power meter sensor in it.
If you get that itch for more data a year or two later, you can add a right pedal with a sensor in it for a little less than what you paid for the first pedal.
Or, if you value transferability along with performance, you can buy the left and right pedal Duo version right from the beginning for about the same price as the Quarq DFour.
You can find the Favero Assioma at stores with some of the best customer satisfaction ratings and lowest prices for this power meter by clicking on this link to Power Meter City.
BEST PRICE STORE PRODUCT LISTINGS
Here are the product page links to the established and proven power meters at stores that have them at the best prices and also have top customer satisfaction ratings.
Note, where you see “ITK10” after a link, this store will provide In the Know Cycling readers who link from this site to their store and enter that code an exclusive 10% discount. Pretty great, right?
Best Performer:
- Quarq DZero Competitive Cyclist (spider), Competitive Cyclist (crankset), UK/EU Merlin, Chain Reaction Cycles, Wiggle, Tredz 10% off w/code ITKTDZ10 and
- Quarq DFour Competitive Cyclist UK/EU Merlin, Wiggle, Tredz 10% off w/code ITKTDZ10.
Best Value: 4iiii Precision (single) – Power Meter City 10% off w/code ITK10, Merlin, Wiggle
Best Expandable: Favero Assioma – Power Meter City
Others, alphabetically
4iiii Podium (dual) – Power Meter City 10% off w/code ITK10
Favero bePRO – Power Meter City
Garmin Vector 3 – Competitive Cyclist, Power Meter City, Tredz, Wiggle, Chain Reaction Cycles
Look Keo Power Meter – Competitive Cyclist
Pioneer Power – Competitive Cyclist
PowerCal – Amazon, eBay, Cyclestore
Power2Max – Power Meter City
Powertap Pedals – Competitive Cyclist, Power Meter City 10% off w/code ITK10, Tredz 10% off w/code ITKTDZ10, Chain Reaction Cycles, Wiggle
Powertap C1 – Competitive Cyclist
PowerTap G3/GS – Competitive Cyclist, Power Meter City 10% off w/code ITK10, Wiggle, Tredz 10% off w/code ITKTDZ10, Chain Reaction
Rotor INPower – Competitive Cyclist, Power Meter City 10% off w/code ITK10, Merlin, Wiggle, Tredz 10% off w/code ITKTDZ10, Chain Reaction
Quarq Riken and Elsa – eBay Riken, eBay Elsa
Stages – Competitive Cyclist, Power Meter City, Tredz 10% off w/code ITKTDZ10, Chain Reaction, Wiggle
Velocomp PowerPod – Power Meter City 10% off w/code ITK10
Verve Infocrank – Power Meter City 10% off w/code ITK10
* * * * *
Thank you for reading. Please let me know what you think of anything I’ve written or ask any questions you might have in the comment section below.
If you’ve gotten some value by reading this post or any of the reviews or comments on the site and want to keep new content like this coming, click on the links and buy at the stores they take you to. You will save money and time while supporting the creation of independent and in-depth gear reviews at the same time. If you prefer to buy at other stores, you can still support the site and new posts by taking a pull here. Thank you.
And please, let’s stay connected! Using the widgets in the right-hand column, you can sign up to get an email when new posts come out, follow on Twitter and Facebook, and get posts sent to your RSS reader.
Thanks and enjoy your riding safely!
Well currently I don’t own a power meter, so I am aware just of my Functional Threshold Heart Rate. From that and some charts from internet I estimate my FTP somewhere below 4W/kg.
Obviously my wish is to win this gift and buy a power meter, which will help measure my FTP more accurately. Owning a power meter would also help me to pace myself better on longer climbs and hopefully take desired KOM on local hill. Hopefully with some power meter specific training I could also reach this magical number of 4W/kg.
my goal this year is to get my ftp above 4.5w/kg. Of course not currently owning a power meter this has to be measured using my uni gyms watt bikes, but being able to train with power all the time would give me a huge benefit with regards to training and recovery and make my goal far more achievable.
I need something (like $500 towards a power meter!) to get me past this plateau I’ve hit!!! 🙂
This year I want to be able to get my local 40 tt time down to 1:10. I’ve never used power before but read so much about it. Using a power meter would help me train more efficiently around my studies and achieve my goal.
My goal is to run the famous march QUEBRANTAHUESOS (Spain, 06/17/17, 200 km, 3.000 m+) in less than eight hours. The secret is to road with a median power of 75% of my http://FTP... and eat & drink!
I’m targeting the Pikes Peak Hillclimb; a power meter would definitely help with pacing at 14,000′.
Hey steve, i have been reading your blog and it has been very helpful to me. Since I’m planning to build my focus evo cayo frame thanks to your detailed reviews i might get the enve 3.4 or dt swiss r24/rc28 depends on the availability in my country. Still have to read on those groupsets.
Right now my goal is to finish my first ever relay(bike) in ironman this coming march12. I’m so excited ? I practice every morning alone and i never knew a power meter could help me with my training program. So i can asses the data after or during ride if i improved or not..
Dear Steve,
I am a road cycling enthusiast from the Netherlands. At the end of 2016 I had achieved my goals for that year (competing in some local amateur races and finishing first in a 3 day stage race among a group of friends in the Vosgues in France).
For the year 2017 my new goal is to compete more serious on the local level and ride the Marmotte Grand Fondo in France (a famous ride here in Europe which includes famous mountains like the Glandon, Galibier & Alpe d’Huez. A power meter would really help to train more seriously towards achieving these goals.
I have considered buying a power meter but I also needed to upgrade my wheels. I have chosen to upgrade my wheels first since this would probably make the most impact I figured. I replaced my 5 year old Mavic Aksium wheels with nice hand made aluminium clincher wheels (the new Pacenti SL23 rims combined with the new Hope RS4 hubs) which would probably give me more of an edge in 2017.
Funds are low after spending my money on the new wheels but I keep thinking about the powermeter. I came a cross your post about giving away a powermeter and I thought I would give it a shot by telling my story.
Another option would be to ask a powermeter for our 5th year wedding anniversary (which is coming up february 15th) but if I want to have a chance of making it another 5 year with my wife I am probably better off with something non-bike related.
A powermeter for me would help me target my new goals definitely! (and at the same time save my marriage) 😉
I’ve never done Mt Washington Bicycle Hill Climb and I’m not confident I could prevent myself from going too hard at the bottom without a power meter to guide me. Thus, my power meter goal would be: identify a target power that I can confidently hold for about an hour on steep terrain and then use it to optimize my time and get a top-10 place on the 2017 Mt Washington Hill Climb.
I have the 4iiii gen1 for almost one year. While I can’t boast about my W/kg, I use it to pace myself. The goal this year is to hopefully improve my ftp and pacing for longer climbs and rides.
I am looking at the 4iiii. I road 1600 last year after knee replacement the year before (700 miles). Looking forward to breaking 2,000 miles.
Dear Steve,
A road cycling enthusiast over here. Over time, i have worked up my fitness to get from Pack 3 (the newbies) to ride with Pack 2 (advance riders) and finally able to keep pace most of the time in Pack 1 (the fastest in the cycling club).
My target this year will be to be able to hold onto the pack as it surge and attacks. To do that, i estimate that i’ll need to maintain an average pace of 35 km/h on solo 40k rides. I figured a powermeter will help me execute a structured training to achieve this goal.
I have another question about interoperability that I have not been able to find answered on other sites or forums (but I have not yet asked Shimano or Stages or 4iiii). Maybe someone here knows?
This question has more to do with cranksets and bottom brackets than power meters, but exchanging a power meter between a road bike and mountain bike is what motivates the question: can a DuraAce or Ultegra left crank be installed as a replacement for the left crank on a mountain bike (e.g. XTR, Deore XT, etc.)?
Same question applies for SRAM, FSA, or other brands for which crank-arm based power meters are available and which also have both road and mtb cranksets.
Hi Nate. While I can’t talk to all of the possible iterations between the different brands you mentioned, I do have some general thoughts. Often times, you could indeed slide a MTB left arm on a road crank spindle, and vice versa. For example, with Shimano, you can slide a MTB crank arm onto a road spindle (putting aside the potential problem of different spindle lengths…as that would be an issue on a case by case basis). However when you tried to turn the cranks…you would likely find that the crank arm would impact the chainstay. This is because MTBs have wider frames. To help compensate for this, MTB crank arms have more ‘bend’ or a wider Q factor – so they can clear the frame. Another problem is with durability or safety. While still quite strong, road arms are built to be light. They aren’t tested for the rigors of off road use. If you compare the arms side by side, you will see that MTB crank arms are typically more robust.
Thanks for the reply. Another setup I’m thinking of is a temporary hill-climbing configuration of my road bike with the usual road crankset replaced by a 2x MTB crankset in order to get a much smaller chainring in the ballpark of 24 teeth. Assuming this is actually possible with the variations in spindle lengths like you mention, it would also be nice if the left road crank arm (with Stages or 4iiii power meter) were compatible with this MTB right crank & spider so that the hill-climbing setup doesn’t sacrifice power meter capabilities.
Assuming you can find a MTB crankset that fits the bottom bracket and works with your drivetrain, you could just get a MTB left crank arm with power. They make MTB power-equipped versions just like for road. We have them in stock.
Right, but I would want the power meter primarily for my road crankarm… only swapping on to the MTB spindle when that crankset is installed on my road bike in the “climbing configuration”. Sounds like the biggest challenge will be finding a MTB crankset compatible with my road bike. Thanks again.
Steve,
I have really enjoyed your posts and find them very informative. I ride 4 days a week on my wind trainer using hr only. I find that he can take one only so far and believe that a power meter would not only elevate my riding, but also give key indicators for over training.
My goal is to average 40km/h on my next century race in June.
Hey Steve, another well researched article. I have been reading your website for quite awhile now as you do the most detail reviews on cycling products. Takes awhile to read you articles so I can only image the time it take to write them. I have bought a few product now based on your reviews and have been happy with all my purchases. I really like the way that you write your reviews and gear them towards the enthusiest instead of the pro level rider. Have been looking at Power Meters for at least a year now so this article could not have come at a better time.
The reason I need a power meter is that my goal last year was to lose 10 lbs and improve my overall fitness level for cycling. However, due to a couple of injuries, I ended up gaining 15 lbs and I am now trying to get back the fitness I lost. So I am hoping that a power meter will help me lose the weight quicker by training more affectively.
Keep up the reviews!
I need power meter to improve my FTP and climbing strenght. My goal is to climb Coll de Rates in Spain under 24 minutes within a year.
I need a power meter to get a better handle on my strengths and weaknesses and my fitness progression. By combining power readings over time with a software program capable of simplifying the output – I know I can use this knowledge to train more effectively.
Wonderful article. I’m pretty new in all the power measurement thing. But since I started last year to train on a Tacx with powermeter, I could improve my performance also on real roads. Next step would be to have a powermeter also on the bike, so I can train using power measurement also outside. My goal? Improve my PR uphill, in particular on a home climbing segment of 5,5km with avg 7% slope.
I need a power meter to better pace my training efforts. I feel like it will help me get stronger and smarter about how I ride my bike in preparation for the road racing season here in Australia.
A power meter would be ideal for spring training on the flat here in Finland for summer climbing in the Alps.
Steve,
I’ve really enjoyed reading your reviews on equipent. Thanks to your “How to Ride Faster on Your Bike” article–I know that a power meter is the next piece of gear I will add to improve my cycling. This year I’m looking forward to an Everesting of Hurricane Ridge in Washington state by the end of May. I’ve already started training to improve my climbing, but I know a power meter would help me train more effectively.
Everesting Hurricane Ridge is an enormous goal, but I’m excited to tackle this beast!
Cheers!
Ben
Steve thanks for all the great info and reviews. My number one goal for this year is to complete an Everesting challenge. Came close last year but let it beat me mentally its as mental as physical.A power meter would be nice to have for this challenge. Thanks Rick
doing the Wow Cyclothon race in Iceland this summer. Hoping to get a power meter to help me work on interval training to build my speed!. Thanks! Alan
Great article as always! Looking to add a power meter to my training to get ready for two weeks in the French Alps this Summer.
When I first started racing, one of my friends had an ftp of 333. My goal is to get my ftp to that level while maintaining my ability to race effectively through the collegiate season with the help of TrainerRoad and friends that I have made over the last 4 years of collegiate cycling. May be graduating from college, but I’m not finsihed cycling yet!